
What is the so-hated flickering? How can we prevent and fix the flickering in post-production? Learn all about this imperfection which affects time lapse videos, how to avoid it when shooting and to correct it afterwards using several softwares!
Let’s start now!
Introduction
In this excellent Guest Post written by our expert friend and partner Giovanni Antico – Adobe Certified Expert and Adobe Certified Instructor – we will discover not only how to prevent, but even how to avoid and treat flickering!
Remember to leave a comment and tell us what you think, it’s important..!
Under some environmental conditions, changes in light can be so rapid that it is difficult to avoid flickering in a time-lapse.
For example, rays of sunlight filtered through clouds moving quickly and erratically; lights and shadows on the subject to be photographed may change rapidly and significantly.
However, even under conditions of constant light is easy to run into problems with flickering, due to the limitations and settings of the machine and/or lens. The problem is much more noticeable if you shoot in JPG with all automatic.
A good starting point is to choose all the settings manually (with the RAW white balance that can be adjusted).
Unfortunately, even if you set everything manually, it is not always exactly the same exposure from one shot to the next. The diaphragm closes each time allowing a very small margin of error, imperceptible in photography, but quite impactful in time-lapse: you end up comparing up to 25 photos per second and because the video is in slow motion you will see every small imperfections.
httpvh://www.youtube.com/watch?v=fG5QedhroYQ
For a time-lapse with sunrises/sunsets or large changes in light, the ideal would be to make the “ramping” of the times with bulb exposures, rather than use the program to aperture priority (Av).
With the camera attached to a PC, you can use GBTimelapse (only for Windows). Outdoors you can use a programmable interval timer, such as the Little Bramper (already on the market and well explained on TLN) or Timelapse+.
The ramping overcomes the problem of the small variations between one shot and the other, but it also leaves us free to finish a time-lapse exposure completely wrong. You can still correct the ramping gradually, without interruption, but you will have to fine tune the shooting from start to finish.
With Av, on the contrary, you will come across small but less frequent variations from shot to shot (more accentuated if we do not set the spot metering), but you can leave the camera alone and after many days of exposure it will always be correct for every single frame.
It is probably inevitable sooner or later to have to correct the flickering. There are some techniques which attenuate it during shooting, but it is also important to take proper care in post-production. As a follow on from this background information, here is a summary of the possible solutions to reduce the impact of the problem.
How to prevent flickering (shooting in full manual mode)?
1. “old school” lenses, without electronics
With the old manual lenses, which allow you to set the aperture on the dial instead of the camera, the diaphragm will always remain where we left it, circumventing the problem of micro-variations. With adapter rings you can make a modern lens invisible to electronics and you can afford to mount a Nikon lens on a Canon body or vice versa. Even with the Lensbaby with manual apertures you will continue to solve the underlying problem.
You have to give up the optical quality of the more modern lenses (unless you use adapters) and the automatic correction of the defects of the lens in Lightroom or Camera RAW. For the wide-angle some detail may be missing, but it may be supplied by making manual adjustments in Lightroom or Camera Raw.
2. Electrical contacts disconnected
After you set the desired aperture and while pressing the small button of the preview of depth of field, unlock and turn the lens a few degrees, the minimum to disconnect the electrical contacts, stopping as soon as you see on display a diaphragm value like “00″.
Alternatively, for those who have the key as just mentioned, you can unlock and turn the lens while in video mode to reach the desired aperture. As long as the contacts are uneven the diaphragm will stand still, even if you go back to photo mode.
It’s a solution that is a little bit rough, but fairly simple and proven to work: it is also useful for shooting video with the first firmware, when you were not able to choose the aperture.
Maybe not highly recommended in extreme environments, such as a deserts with a lot of wind and sand that could reach up to the sensor as the defence of the sealing machine and lens can be thwarted if the lens becomes loose beyond a certain point.
However, with a little attention to detail, the chances of accidents are very low, but if the eventual lens falling off is likely to cause an accident, then it is better to take precautions.
With the tele-lenses attached directly to the tripod the danger is the camera body falling. A good solution is to tie a strap on the tripod or something stable.
It may also be worth a shot before you detach the lens, to save the EXIF data complete, to be used later in “Lens correction” of Lightroom or Camera RAW.
3. Live view always on/video shooting mode
With some machines you can always keep the diaphragm fixed by software, simply by enabling the live view for the video, which also offers a preview of the crop in 16/9.
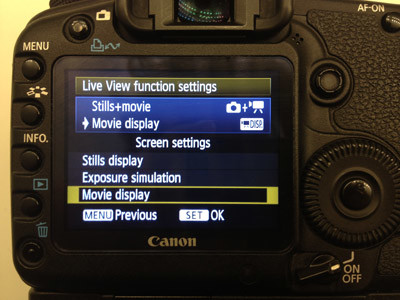
With Canon 5D Mark II you have to go into the second yellow menu > Live View/Movie func. set. > LV func. setting > Stills+movie > Movie display > OK.
With Canon 7D it is enough to switch in video mode.
In both cases, the intervalometer will be working with no problem. The major limitation is the inability to fall under the constraint of time imposed for shooting video (1/30). In practice, it is useless for night shots and more useful for daylight shooting.
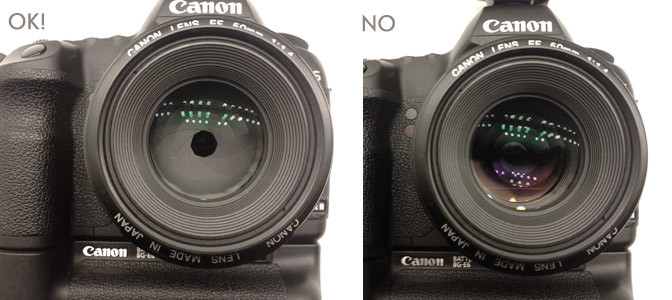
With other models there may be options or custom functions to get the same result, but the only way to really understand if we get what we need is to look at the diaphragm (it’s more obvious with a bright lens).
For example, if we mount the 50mm f/1.4, choose the aperture 22 and do some shots with a time of half a second, It’s then pretty easy to tell if it stays fixed or if it opens and closes with the shot.
Benefits: you can monitor the progress of the time-lapse without touching the camera and avoiding any movement. It also prevents vibrations from the mirror as it goes up and down, as it will always be lowered: for longer periods of time, it may be annoying.
Disadvantages: battery grip and various batteries become a necessary option. The noise could get worse with the gradual warming of the sensor (full frame holds up better of all, 7D is fine, 60D and 600D disperse a little less heat and may suffer more).
Conclusion: lock the iris in software would be ideal if the firmware of the parent is not hiding or precluding this simple but important option for time-lapses. For the time being, and with severe limitations, the only software solution is the live view video, but there is always hope for future firmware that will update the original or an alternative such as Magic Lantern.
4. Aperture fully open or fully closed
If you have already adopted one of the above solutions, you can go for the widest apertures, ideally set at maximum (and as a second alternative, fully closed): this could shrink the margin of variation between one shot and the other, although each lens behaves in a different way.
Unfortunately, this solution heavily constrains the exposure (some ND filters would give a little more control) and especially the depth of field : it could therefore be considered as the ultimate fall-back.
How to remove flickering in post-production?
1. Deflickering with LRTimelapse
This is very effective, and it can also be used with Bridge + Camera RAW, but is more suited for certain pairing, such as combing with Lightroom.
It is currently the only solution for reducing the flickering directly on the RAW files, where it is known to work well. Therefore, it is the first instrument to be taken into consideration if you shoot in RAW.
Learn the Basic Workflow for time lapse processing with LRTimelapse.
(Edit this wonderful article by GAntico, adding a new free alternatives to LRTimelapse – TLTools by Mamo, which was not existing at the time of the first draft – Marco Famà)
2. Deflickering with TLTools
This is a fantastic solution, completely free of charge and written from scratch by one of the most passionate community members of Time Lapse Network, Mamo.
It does its job very well directly on the RAW files, as well as LRTimelapse, and allows you to directly export the final video. Try it: download the latest version now.
3. Deflickering with GBDeflicker
This is a great and relatively cheap solution ($ 99). By learning how to manage settings and configuring ad hoc, it vastly improves the result. Manufactured by a software house that are practically alone in their dedication to the world of time-lapse, is probably the best plugin out there. Perfect when used with After Effects. On the other hand, Premiere CS5.5 for Mac gave some crashes.
On Windows there is also a standalone version: you can use alone and with some features that could not be implemented in the plugin version.
4. Deflickering with Sapphire Deflicker
This is very expensive ($ 1900) because it is only sold in a package of many plugins. For those who have an NVIDIA CUDA, it has an unbeatable rendering speed, but version 6.0 was systematically crashing with longer projects. Maybe the upgrade to the 6:02 has corrected the bug, but few in the world of time-lapse are using it over the test period, given the price which is senseless for a single plugin.
5. Deflickering with MSUDeflicker
This does the job respectably and has a good reputation (even on TLN there’s a lot of positive feedback). It is a little cumbersome to install, but easier to use. It is also free. Do note that it does not have more advanced features such as LRTimelapse or GBDeflicker for example, in order to indicate a specific area to be considered for analysis.
Please note that this article is a Italian to English translation of the original tutorial available on Time Lapse Italia, written by Giovanni Antico.
