Learn the basic workflow for time-lapse processing directly from Gunther Wegner, author of the worldwide known software for time-lapse sequences deflickering LRTimelapse 4.
 Let's then have a look at what you need to do to create a flickering-free time lapse video, starting from the basics: Importing, Keyframing and Rendering RAW-files or JPGs time lapse sequences.
This tutorial is an excerpt of Gunther Wegner’s must have E-Book Time Lapse Shooting and Processing and will introduce you to the basics of editing time lapse sequences using the power of the Adobe Raw Converter found in Lightroom combined with the keyframing abilities of LRTimelapse.
LRTimelapse 4: The Visual Workflow
In the following descriptions of the Visual Workflow in LRTimelapse, I'm assuming that you already have your sequence saved to the hard drive. To begin working with the sequence, it doesn't matter whether you have used the LRTimelapse importer, or have imported it through Lightroom or copied it by using the explorer/finder. For its part, loading a sequence is always carried out by going to the file tree at the bottom left of the LRTimelapse user interface.
All Workflows in LRTimelapse are designed to work by clicking the buttons from left to right. All buttons will show tooltips, explaining what to do.

LRTimelapse 4: Creating keyframes
After loading the sequence, just click on the button, Keyframes Wizard. This automatically produces so-called ‘keyframes,’ which is a labeling system for ‘key images’ that you'd like to edit later on in Lightroom. LRTimelapse will later automatically compute the settings for all other frames that have not been assigned the status of keyframes. This offers the huge advantage, that you only need to edit very few images on certain key positions in the sequence and LRTimelapse will then calculate all intermediary edits automatically – no matter if it’s just different conditions of light, or even the ‘Holy Grail’.
The Keyframes Wizard will automatically analyze your sequence and place keyframes according to a clever algorithm. The more changes in brightness there are in the sequence, the more there will be different points that need to be edited, and therefore the more keyframes will be created by this process.
The number of automatically generated keyframes is of course only a suggestion: you can increase it or decrease it at any time, just by moving the slider to the left or right.
Keyframes will be signified by a blue diamond icon by default. Depending on your sequence you will see one or more keyframes being created after clicking on Keyframes Wizard. So that we have identical conditions for the purposes of this introduction, I'd like to ask you to work with 3 keyframes for your very first run-through.
If the sequence you are editing has been shot with the ‘Holy Grail Method’, (that means, you adjusted the Exposure, ISO, Aperture while shooting in M Mode) the Keyframes Wizard will create additional keyframes symbolized by small orange triangles. Those will mark the positions, where the camera settings have been adjusted. Apart from this, you could just ignore them when working with LRTimelapse 4.
LRTimelapse 4: The Holy Grail Wizard
The Holy Grail Wizard will be enabled only if you’ve captured your sequence according to the Holy Grail Method, i.e. you changed the camera settings in M-Mode while shooting. If it’s enabled, please just click it once to calculate all compensations for those adjustments. You will see an orange curve appearing that looks like a mirrored version of the blue zig-zag luminance curve.
Use the sliders (mostly Offset and Rotate) to bring the orange curve close to the horizontal line in the middle, like in the following image.
 The Holy Grail Wizard calculates a curve that compensates for the blue curve that has a zig-zag form due to the adjustments on the camera.
If you didn’t work according to the Holy Grail method, the Holy Grail wizard will be deactivated. In that case, please just skip this step. Click on Save in order to save the XMP-Metadata of this sequence.
Drag the Sequence to Lightroom
Make sure that Lightroom is open. Check, if the folder with the sequence has already been added to your Lightroom catalog – in that case, please remove it from there:
ATTENTION - In case that you have imported the sequence from your memory card using the Lightroom import-dialog, the folder has already been added to the Lightroom catalog. Please check, if this is the case, if so, please remove the folder again from the catalog (right mouse on folder and then Remove. If you however followed the workflow that I recommended, and used the LRTimelapse importer, or you copied via Explorer or Finder, then, of course, this will not be necessary.Another option, would be to just select the whole sequence and then Metadata | Read Metadata from Files if the sequence is already contained in the Lightroom catalog.
Your sequence and its initial editing now have to be brought into Lightroom.
- Drag the Button Drag to Lightroom! from LRTimelapse via drag-and-drop onto the Lightroom Library. This will call the Lightroom import dialog with the correct folder.
(Make sure to have the Library module selected in Lightroom before since drag-and-drop won’t work, if the Develop module is active!)
- Make sure, that at the Add-Option is selected at the top of the Import-Dialog (not Copy!!), in order to add the images to the Lightroom catalog.
Now your sequence has been added to Lightroom and you should see that your keyframes have a ****-rating.
Right-click on one of the images in your sequence and then choose Go to folder in Library. This will ensure that you will be working on the actual folder, and not on a collection (for example the Last import-selection, that gets automatically selected after any import).
 Choose the right filter in Lightroom. If you can’t see the filter-chooser, just click once on the label ‘Filter’ to reveal the filter-chooser.
Edit Keyframes in Lightroom
Select the filter LRT4 Keyframes, in order to see only the keyframes. Those are the images that you will edit now.
Now edit the first Keyframe like a regular photo. Once you are finished, select it in the filmstrip at the bottom then select the last keyframe while you hold the Shift-Key.
The Keyframe that you’ve just edited now becomes the ‘most selected’ image, its selection appears a bit brighter than the selection of the other keyframes, which are selected too.
 The left keyframe is the ‘most selected’ – its settings will be transferred to the other selected keyframes with help of the ‘LRTimelapse Sync Keyframes’-script.
Now, from the Script-menu in Lightroom choose LRTimelapse Sync Keyframes – this will bring the develop settings from the first (most selected) keyframe to all other selected keyframes.
On Windows:
 Please always use the dedicated script to sync settings across keyframes.
On a Mac:
 On a Mac the Script- menu looks like a Script-roll.
CAUTION - When working with LRTimelapse 4 please don’t use Copy/Paste or the native Synchronize feature of Lightroom – instead always use the ‘LRTimelapse Sync Keyframes’-script.Exception: Should you want to synchronize only single tools, like the crop, you have to use Copy/Paste or the native Synchronize for this – but in those cases, please take care that you always exclude the Gradients!
Now continue editing the second key-frame. Based on the development settings just transferred, you'll be able to modify the editing from keyframe to keyframe. You can, for example, adjust the brightness and the white balance. Go ahead and overdo it a little for the purposes of your first run-through by altering the colors with the white balance, or by desaturating the image to create a black-and-white shot (use the Saturation control for this, and not the black-and-white tab next to HSL).
Once you are finished with editing the second keyframe, again, click on the last keyframe in the filmstrip while you hold Shift in order to have the second keyframe ‘most-selected’ and the ones to its right normally selected. Now sync again using the LRTimelapse Sync Keyframes-Script.
Go ahead, repeating this process until all keyframes are edited to your liking. The last image will thus always serve as a starting point for editing the next.
Finished? Super! Now we'll want to have the development parameters for all of the successive pictures in between the keyframes be calculated. In order to be able to access the development parameters, we need to have them written to the XMP metadata once again. Luckily, there is a command under the Metadata menu for just this purpose: Save Metadata to Files, which can also be called up with the keyboard shortcut Ctrl+S.
IMPORTANTPlease make sure that you're always in Grid view (G) and that you have selected all the images (Ctrl+A) to which the operation will apply before you Read Metadata From Files or Save metadata (Ctrl+S). If you do this from the Develop-Module, Lightroom might not consider all images, this is a bug in Lightroom!
In this case it's enough to write the metadata for the modified keyframes, meaning you will not have to remove the filter.
Now switch over to LRTimelapse again.
Back to LRTimelapse 4 to reload
Now it's time to proceed with the second row of the LRTimelapse workflow.
After you have saved the metadata of the photos that you've edited in Lightroom, you'll need to update these values in LRTimelapse. To do so, simply click on Reload and the development settings will be loaded anew.

You'll see from the table that the keyframe's parameters have changed. If you have altered the exposure slider, the yellow curve visible in the preview will also be different now. You can select the parameter that's superimposed as a curve from the drop-down menu in the upper righthand corner of the preview.
At this point, only the edited keyframes reflect your modifications; the intermediary images have not yet been touched. We'll do that now by turning to the Auto Transition function.
LRTimelapse 4: Auto transition
Click on Auto transition and LRTimelapse will automatically calculate the development-settings for the intermediary images to create smooth transitions between the keyframes.
Again, you'll be able to see the changes in the table as well as in the preview graphic.

TIP - If you press the button ALL above the preview, all parameters that you have modified in Lightroom will be displayed as curves, superimposed over the pre-view image.
Save
Now save the sequence by clicking on the Save-button of the workflow in LRTimelapse.
By the way: all workflow buttons with the same name, do exactly the same. They are only duplicated to enable a better visualization of the workflow.
LRTimelapse 4: Visual Previews
Maybe you’ve noticed, that you can’t yet see your edits visually in the preview. Until now, you only see the edits as numbers in the table and as curves superimposed on the original preview. This is, because the images have not yet been developed with the new settings. In the next step now, you are going make LRTimelapse create visual previews in order to get to a visual impression of the final look of the sequence. Those visual previews will then be used as the basis for deflickering the sequence too.
Please Note - If you are in a hurry and know that you won’t be using the deflicker feature, you can skip the third row of the workflow and continue in Lightroom, to export and render.The same applies, if you work with a JPG sequence. Unfortunately the visual previews are not available for JPG sequences, so just use the Basic Workflow with its Simple Deflicker, since this works based on the original previews.
In those cases you could continue on section [Exporting the Time-Lapse Sequence] on page 16.
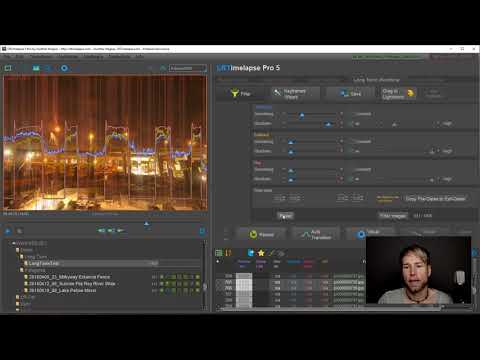
Now click on Visual Previews. LRTimelapse then starts developing the images and exchanges the previews with ones that have the developments applied. A pink curve now plots the luminance progression (similar to the blue curve that superimposed the original previews).
Once it’s finished, please scrub through the sequence and check the pink curve – is it as smooth as you would like it to be? Use the Play-button too to play your now developed sequence. Do you still see any flicker-effects?
 After applying all edits the pink luminance curve might not be smooth. We are going to change this soon with the help of the ‘Visual Deflicker’.
There might be different reasons for a pink curve, which lacks smoothness:
- Strong editing of the keyframes in Lightroom
- Discrepancies between the actual behavior of the camera regarding ISO, Aperture and Exposure-time and the information that is being written into the EXIF data.
- Flicker due to aperture, exposure, etc. like discussed before.
- Natural changes in brightness.
LRTimelapse 4: Visual Deflicker
 The smoothing slider for the Visual Deflicker
Now activate the Visual Deflicker (this requires that all visual previews have been generated upfront).
Now change the Smoothing-Slider until the superimposed green curve looks like you would like the pink curve to be. Take care to follow the long-term trend with the curve and only smoothen short term flicker effects. You can find a video-tutorial showing the process in the tutorials section on LRTimelapse.com.
If necessary, now define a reference area for deflickering, this is shown in the tutorial liked above and explained in depth in the e-book “Time Lapse Shooting and Processing”. You can skip this for your first test, but normally this can be very important, depending on the content of your sequence.
Now click on Apply and then on Save.
Now you have two options:
- Wait until the visual previews have been renewed, this time provisioning the visual deflicker in order to check if the pink curve now has the desired smoothness. If this is not the case, you could apply another step of deflicker by using the Refine-function. This would then calculate further corrections based on the current developments. You could do this as often as you’d wish, but mostly once is sufficient.
Please note that, depending on your sequence, getting a luminance curve that is totally smooth is not always possible or even reasonable. Often, choosing the right reference area for deflickering makes a huge difference.
- The other option is to change back to Lightroom to render the sequence after you apply deflicker without waiting for the visual previews to refresh. The changes (that you would wait for to being developed once again here in LRTimelapse) have already been applied to the metadata. In this case make sure to turn off the generation of the visual previews, before heading back to Lightroom to save processing power (that would be of better use then for exporting from Lightroom). You can do so by just clicking once more on the Visual Previews-button.
Load the final edits into Lightroom
Again, make sure you're in the grid view (G) and that LRT FULL SEQUENCE is selected from the filter list.
Now select the whole sequence with Ctrl-A and choose Read Metadata from Files from the Metadata-menu. Now you’ll have the sequence with all edits in Lightroom.
Exporting the Time-Lapse Sequence
This time, we don't want to use the limited Slideshow module to output the sequence, but rather leave this job to LRTimelapse, which will communicate with Lightroom via a special Lightroom plugin.
The export proceeds via Lightroom's regular export function from the Library.
The whole sequence should still be selected, so just click on Export (or Ctrl+Shift+E), as if you would export still images.
 The export happens via a special LRTExport-plugin directly from the Lightroom export dialog.
If necessary, open up LRTimelapse presets from the Presets panel on the left and click on the uppermost one called LRT (JPG, 4K).
No worries, this won’t necessarily render in 4K, it will only create an intermediary sequence in 4K – the final resolution for the video will be defined later.
On the right, you'll see some configuration settings that can, for the most part, be ignored from here on out. For the first usage, however, you'll have to establish a main destination file path for the output.
This path determines a parent path that will be used in the future to house all timelapse films and intermediary sequences. I recommend providing a dedicated folder on a separate hard drive with enough free space.
The name of the sequence will be automatically entered and follows logically from the folder name of your timelapse sequence. If you end up working with many sequences, you'll really begin to appreciate this automation.
Please note - The whole workflow has been streamlined for efficiency. Avoiding unnecessarily typing of filenames is only one thing that LRTimelapse tries to save you from. Normally you define the name of a sequence when you import it from the memory card via the LRTimelapse importer. This name will be carried through the entire workflow then automatically.
Ensure that the option Last render settings is not active, and then click on Export.
TIP - Later on you can us the option Last render settings to skip the Render dialog in LRTimelapse and the once predefined render settings will be used for the next video too.
Lightroom will first prepare the entire sequence as JPG files and then hand them off to LRTimelapse.
After the progress bar in Lightroom has completed its run, LRTimelapse will automatically pop up and display a dialog box in which you can define all relevant settings for the video rendering.
Rendering the final video in LRTimelapse from the intermediary image sequence
LRTimelapse will now continue on with the intermediary sequence and display a dialog in which you can set different parameters for the rendering of the video.
 The Render-dialog in LRTimelapse – from here you will be exporting the final video based on the intermediary sequence.
The sequence to be rendered will automatically be entered, and a file name for the outputted video will also be automatically generated at this point.
Automatically defined settings will be appended to the file name for the video according to an algorithm that includes the video format, the resolution, the quality, etc., so that you won't have to give it a second thought. What's more, any time you view the video later on, you'll know at a glance the settings that were used to produce it. Furthermore, you can output several versions of a film with different combinations of settings (see the explanatory box below) without having to worry about giving them different file names.
Set the desired output size in the dialog box, such as 1080p, as well as the playback rate, such as 30 fps. You'll be able to see now that you have all standard playback rates to choose from and that you're not committed to just 29.97.
The next thing to do is set a resolution quality for the video export. Please note that the ‘high’ setting already offers a very good quality output; unless you have a valid reason for it, you shouldn't have to choose a higher quality for the film, since doing so will inevitably also make for larger file sizes and higher demands on the player. You can always go back in and render a new video as needed, should the quality strike you as insufficient.
In the righthand area, you'll see several functions under Post Processing that are applied after scaling to the desired output resolution – functions such as the output sharpness (under Sharpen). I recommend enabling this for every case.
A great function that can be used to add some smoothness to many timelapse sequences is the LRT Motion Blur Plus. It transitions neighboring images and simulates a certain amount of blurriness in moving elements. Of course, it can't replace working with long exposure times (as with the 180° rule) – but it can make bumpy sequences a little less so and, especially in combination with sequences that were shot with longer exposure times, it can bring out that 'certain something' in a film. Try rendering your sequence once with this operation and once without, and compare the results. It's possible you'll only ascertain the difference by examining the video very closely; at its lowest degree, the effect is subtle but definitely visible. This feature requires a private license, higher degrees of smoothing are available with LRTimelapse Pro.
Check again, that in the render dialog the option Delete intermediary sequence after rendering is turned off at the bottom of the render dialog in order to enable you to do further experiments with your intermediary sequence later on and render it again with different settings.
Now click on Render Video.
You'll notice that the rendering process in LRTimelapse claims a fraction as much time as outputting the intermediary sequence through Lightroom did.
Once it's done, you'll find the video in the directory configured by LRT-Export, next to the intermediary sequence, assuming you have not had it automatically deleted.
In the EBook Time Lapse Shooting and Processing you'll find a summary of this workflow to print out.
The workflow itself is always the same. What will differ is the number and position of the keyframes and the edits that you'll preform – and therein lies the potential and the fun. There's (practically) no limit to what you can do with creative ideas for editing keyframes by taking profit from the Lightroom tools and flexibility of the RAW-file editing. So that you'll be able to use this creative power to its fullest, I'd like to turn now to covering some important points in the section that follows.
© 2015 Gunther Wegner
This is one chapter about the basic editing of Time Lapse Sequences from Gunther Wegner’s Ebook Time Lapse Shooting and Processing. If you are interested in Time Lapse Photography and editing, please consider buying the EBook, since it will teach you all the secrets from shooting until the more advanced techniques like deflickering your sequences and achieving the holy grail of time lapse: perfect transitions from day to night!
For the sake of clarity, links towards Gunther's LRTimelapse website are affiliate ones. Please note that by purchasing a license or the E-Book, you support the Time Lapse Network... so thank you for doing that!