Professional digital visual artist - and co-founder at Ditogear - Patryk Kizny teaches us his suggested workflow for the post-production of a time-lapse video.
How to create a SDR time-lapse?
Welcome to our specialist tutorial committed to showing you how to work on time-lapse videos in post-production. This section is going to look at SDR (High Dynamic Range) time-lapse sequences.
If you find that this is a little too simple for you, and you want a more complex guide, then you should instead take a look at the Complete Guide to the post-production of a HDR time-lapse video
Let's begin!
Introduction
In this article we'd like to share with you 2 of Patryk Kizny's timelapse post-production workflows. Although the simplest timelapses might be put together using just a set of JPG files and a Quick Time Pro, being a professional and willing to achieve better results requires a bit more complicated approach and you'll need both tools and software to do it.
Please note that
- This article is dedicated to intermediate and more advanced users and is not intended to be software manual
- We are providing it free of charge so if you find it useful, please spread the word on your social networking profiles or make a donation to our Time Lapse Network project.
SDR time-lapse sequences post production tutorial
Here we have a workflow plan which has been put together by Patryk Kizny from DitoGear in order to help you making the most of your RAW files and illustrate to you how it is possible to make use of the rich 12-14 bits of colour depth given by the RAW files from DSLRs.
The principle is simple – in order to get the best image at the end you need to retain the original rich information contained in the source files as long as possible during the workflow and use as few transcoding steps as possible to prevent image degradation.

1. The Shooting Phase
The technical details regarding the timelapse shooting are not a subject of this article, so we don't want to get into details here.
The only things to note here are:
- It is worth it to shoot 2 formats at once: RAW files for standard production workflow and small JPG previews in order to get the quick preview of the sequence
- RAW files should leave some free resolution for cropping/panscanning in post. Unless you have too much storage on your cards and excessive processing power in your office, better keep the files 50%-100% larger than the delivery resolution. Shooting on Canon 5D Mark II we usually set the sRAW 2 settings which are around 2700 x 1800px
2. Quick Preview
The idea behind creating quick previews is to be able to quickly check the contents of the sequence and also provide editors with the footage right after the shoot for offline editing, long before the full resolution masters are processed.
Creating previews out of JPGs is faster and can be carried out even on a laptop on a set. Processing RAW files or full HDR workflow is very time consuming.
Assuming you have the JPG files stored separately form RAW footage, you can generate a quick preview using various software options:
- Quick Time Pro is really fast and is just right for this purpose, so simply import a sequence and render to any preview format you like at decreased resolution (1080p is fine) for a smooth playback.
- After Effects is also capable of doing the thing, but it'll be slower.
- A super fast solution for batch conversion would be setting up an Apple Compressor on a multi-core workstation with the Qmaster.
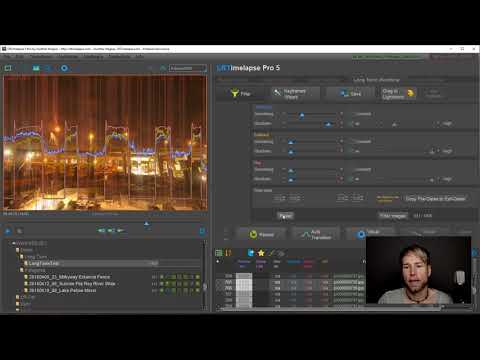
3. Pre-processing
The goal at this stage is to initially develop RAW files, import them to to Adobe After Effects, which is the only reliable program (so far) that is capable of converting a sequence of RAW files to footage, and render the source sequence in high resolution.
3.1. Isolate stills sequence
The first thing that needs to be done is getting the clean set of stills into one folder. Isolate the beginning of your sequence, the end, check for missing frames (Adobe After Effects will be so nice to tell you if frames are missing) and copy/move it to the separate folder.
3.2. Develop the first frame
Open the first frame of the isolated sequence in Adobe Camera Raw (or Lightroom if that's what you prefer) and apply the basic adjustments (exposure, color, contrast etc.)
If you have a sophisticated look in you mind that needs a lot of image manipulation it is better to get as close as possible at this stage, but don't overdo it in any aspect that would cause the image to lose information (for example by applying excessive contrast).
If you head for more less natural look of images try to focus on setting the exposure and other development details in a way that will get as much details as possible form the RAW files. In this case what you want to pull out from RAW files is not a punchy an visually stunning image, but the image that is as rich in details as possible. So don't exaggerate with contrast and color manipulation, but focus on getting rich details from shadows, preventing the highlights from being overblown and reducing image artefacts.
Remember, that at this point you have the most options in your hand as you work on a RAW material from the camera. Depending on your camera the RAW files are up to 14 bit of colour depth resolution. At any point further your processing options will be limited and the working space will not be as flexible as your RAW files are.
A note on White BalanceIf you shoot a scene that is changing in terms of lighting (for example day-to-night) AND you're going for RAW workflow, it is worth it to shoot on Auto White Balance setting. This is important for generating better Quick Time previews and is crucial for getting the proper color balance with AE-only workflow. If you're doing a workflow that is based on LRTimelapse it does not matter, because you'll be overriding the settings anyways.
If you shot Auto White Balance and want to take the advantage of the White Balance settings recorded in each of frames, it is absolutely necessary to keep the WB setting in Adobe Camera Raw to “As Shot” – this is the only way to tell After Effects later that it should read the WB setting from each frame. If you override WB of the 1st frame, all further frames will be developed with the setting you set accordingly (Unless working with LRTimelapse).
3.3. Test your settings on other frames
It is smart to save your development settings and copy/paste them to other frames in your sequence, especially if you shoot in light-changing conditions. This will let you assure you did it the right way and that the developments will make sense on further frames.
After you're done with checking, be sure to go to the folder with the sequence and delete all XMP sidecar files generated by Camera Raw or Bridge in that folder during the testing process. Be sure to keep the first file for the first frame however! This is necessary to prevent After Effects from changing the settings during the sequence.
3.4. Setting the color depth and resolution of RAW development
There is a small link at the bottom of the Camera Raw interface, just underneath the picture. It allows to choose the spacial and color resolution of the developed images. Be sure to set it to 16 bit.
If you shot small RAWs, use the original spacial resolution, but if you shot full res RAWs, set it to about 150% – 200% of your delivery format resolution.
Make sure to set your After Effects project setting to match the Camera Raw color resolution – even if Camera Raw is set to 16 bits, if After Effects is set to 8bits you won't get the extra color resolution.
Working in 16 bits is resource-consuming, but it pays off in quality-oriented workflow. If you're just starting or have limited processing power available, you can stick to 8-bit workflow.
With almost no exceptions, if your work is hitting internet, DVD or TV it will be delivered in an 8-bit format. Working in 16 bits is a overhead you benefit from only during postproduction and color correction.
3.5. Import sequence in AE
This is easy. All you need to do is create a new project in AE, drag the previously prepared folder to the file browser in After Effects and the software will recognize and import a sequence for you. If you add the stills sequence to render queue, After Effects will create a sequence with the right settings for you.
3.6. Apply initial effects
At this stage you may apply the GB Deflicker filter, motion blur or other filters of your choice to the footage and/or perform motion tracking / stabilisation to remove any camera shakes.
Remember to apply only the basic effects for the initial processing of the footage. The final look will be created afterwards, so don't worry about that.
3.7. Render video masters to a richer video format
Up to this point we've been working on an information- rich material. Unless you decided to switch to 8bits, the original color resolution of the RAW files was preserved. Rendering to an intermediate format is the first step in the workflow where you may lose information. It is essential to understand it and keep under control.
There are many factors contributing to the choice of your masters format – type of project you're doing, platform, processing power and storage limitations.
- Uncompressed 10+ bits files
- DPX Sequences
- Apple Pro Res (Mac) or Cineform (PC)
- Avoid Delivery formats
Further details on the above available choices, starting from the highest quality, is available at the original post by Patryk Kizny: definitely worth a visit at this point.
4. The Editing and Grading phases
At this stage you have the high resolution footage ready to edit and grade. You'll probably be able to edit it directly, if not – do your offline edit on the Quick Time previews and switch back to masters at grading stage.
Grade using your preferred software, and you're done ready to export the work!
5. Exporting
Export your final work to the delivery format of your choice.
HDR time lapse video post-production tutorial
You should be now ready to have a deep look into the Complete Guide to the post-production of a HDR time-lapse video.
Credits
Our mission at Time Lapse Network is to provide passionate people with high quality and free time-lapse tutorials, together with a forum focused on time-lapse.
Rather than compose the SDR/HDR post production tutorial ourselves, we chose to opt for the quality contents coming from the major worldwide experts in the time lapse field: Patryk Kizny is definitely one of them!
If you would like to thank Patryk for his courtesy and time taken, then you can:
Please show him your support!
Patryk Kizny - LookyCreative
 Patryk Kizny is a digital visual artist. His skills and activities span across multiple disciplines of visual creation starting from graphic design through photography, astrophotography, motion design to cinematography & timelapse.
Since 2010 he has also been running LookyCreative – an independent film production studio.
He’s also partner at DitoGear – a timelapse and film equipment manufacturer.
![]()
![]()