
TLTools is a free deflickering solution developed by a friend of Time Lapse Italia known as “Mamo”. TLTools works brilliantly well on PC, and is constantly upgraded with new features.
What is flickering?
A very common problem when you create a timelapse video, from a series of photos, it is flickering.
What’s this? The flickering is an annoying variation of brightness that is felt while watching a movie. It’s due to the sudden change in brightness from one frame to another.
What causes flickering?
The flickering is mainly due to micro changes in exposure. These may be caused by two reasons:
- The most likely reason is due to the micro changes to the opening of the mechanics of our camera. The smaller the aperture the smaller the probability of incurring the flickering. For this reason, if you can, you can minimise this effect by blocking a certain opening in the diaphragm (slightly unscrewing the lens).
- The second reason is due to the mechanical imprecision of the shutter that can not have constants times for each shot made.
If you want to know more about this annoying imperfection, please head over to What is flickering, how to avoid it and how to correct it.
How to remove the flickering?
Is it possible to remove the flickering? Certainly. To do this, simply return the value of the brightness of each frame to a value consistent with previous and future frames. Fortunately, there are special programs to do this operation.
One of these is TLTools. You can find it at this address: www.tltools.it.
This software works in a very similar way to LRTimelapse (another premium software for deflickering, which we reviewed in details at “Basic Workflow for time lapse processing with LRTimelapse“). Unlike the latter, it can directly generate the final video.
Like LRT, this software is supported by Adobe Lightroom. Using the metadata it is possible to talk to the two softwares.
The software also offers the possibility to simulate the movements of the camera, do the interpolation of virtually all data that you have while processing a photo (white balance, curves, tones, etc. .).
Metadata
What is metadata?
Metadata is information that include all the data and information of a photo. Adobe has introduced the use of this metadata, storing them in a separate file (called XMP sidecar file extension) in the case of RAW files, or images within the same in the case of processed images (JPG, TIFF, etc.). .
Using these data is possible to modify the processing parameters of the photo that Lightroom will use to create the final images. For this reason it is essential to create this metadata so that they are compatible with the version of Lightroom in our possession. To make sure you have a file “compatible” we advise you to create the metadata from the same Lightroom.
We will handle the processing of RAW files, because much more suited to the ability to be processed without losing quality.
(Remember that the JPG encoding is a destructive and regenerative encoding. What does this mean? Means that every time you save, the photo information will be processed and saved with loss – depending on the level of compression – of information. It’s not possible to go back to the original photo).
Therefore, the first thing to do is import the photos into Lightroom to assemble (hence LR). Once imported, we need to create the metadata. TLTools requires that some data are present in the XMP file.
Among the necessary information we need to save the value of exposure and the eventual crop of the image. How can we be sure that this information is saved? Simple. Just changing them.
Come on in development and insert any value in exposure (eg 0.1) and do a 16:9 crop the photo to fit the typical video format. To make a crop 16:9, LR comes in handy.
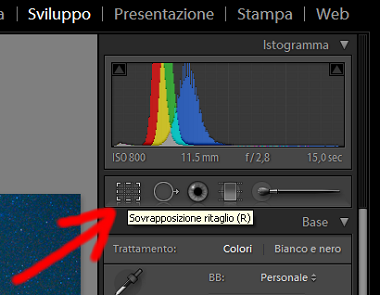
Press the dashed rectangle below the histogram of the image. Press the writing to the left of the lock (pictured under the original name).
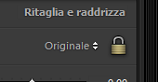
In the menu that appears, select “Enter Custom” and enter the values 16:09 and press return. In this way we have “cropped” (cut out) the image in such a way that it has a typical format video.
At this point we have to make this change on all pictures in the set. Here, too, we find solace in LR. Pressing CTRL + A will select in one fell swoop all the images. Once selected, the lower right corner will display the Synchronize button …. Press and a screen will appear. On this screen, select all and press sync. In this way we have “copied” the changes made to the first picture of all the other photos.
Once you have modified the parameters, we have to save them as metadata. If this is the case, again select all photos with CTRL + A and press the right mouse button. A menu will appear. Look for Metadata and select it. In the submenu that appears, select “Save Metadata”.
We now prepared the metadata to be interchanged between the various softwares.
Let’s go into TLTools
Open TLTools
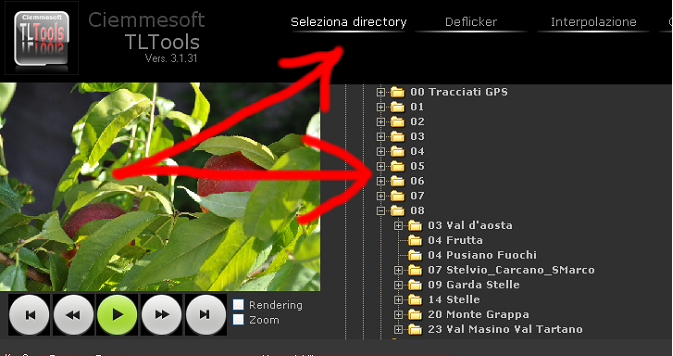
We have to search for photos that we want to process. To do so, select the “Select Directory” in the top menu. Browse the folders and select the directory that contains your photos.
Once you’ve selected all the photos, the software will create thumbnails extracting them from the raw and will try to read the metadata created earlier.
To do so, the program relies on a third-party program. ExifTool by Phil Harvey. This amazing program allows you to extract information from the endless photo files.
During the installation process the program, a copy of this program will be installed in the same installation directory TLTools .
RAW files managed by the program are as follows:
- Nikon: NEF (Nikon Electronic Format);
- Canon: CRW (Canon RaW, estensione file: *.CR2);
- Epson: ERW/ERF (Epson RaW);
- Foveon/Sigma: X3F.
- Fuji: RAF (RAw Fuji);
- Hasselblad: 3FR.
- Kodak: DCR (Digital Camera Raw);
- Minolta: MRW (Minolta RaW);
- Olympus: ORF (Olympus Raw Format);
- Pentax: PEF (Pentax Electronic Format).
- Sony: ARW.
The program will use the thumbnails to make all the necessary calculations. The reason is to speed these computations. Since the accuracy of the action of deflickering is based on these previews, we can tell the program to use the previews we generated ad hoc. In this way we can generate the thumbnails much more similar to the final photos that we want to achieve and then the end result will be better.
To use this feature of the program we need to create a sub-folder to the folder containing RAW photos to be processed. This subfolder must be named TLTOOLS. Create this folder with thumbnails of the images. These previews (it is advisable not to go overboard with the size) must be JPG files.
If the program finds this folder, when we select the folder containing the RAW images, you’ll be asked if you want to use these previews rather than generate them from the program.
Brightness of the images
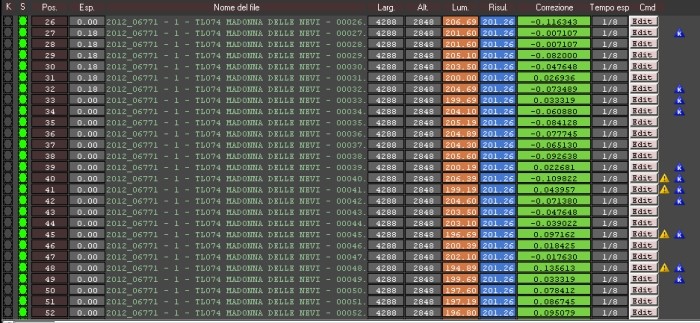
We now need to know the brightness of all images. To make the program calculate the brightness, we have to go in deflicker and press the button “Calculate Bright”.
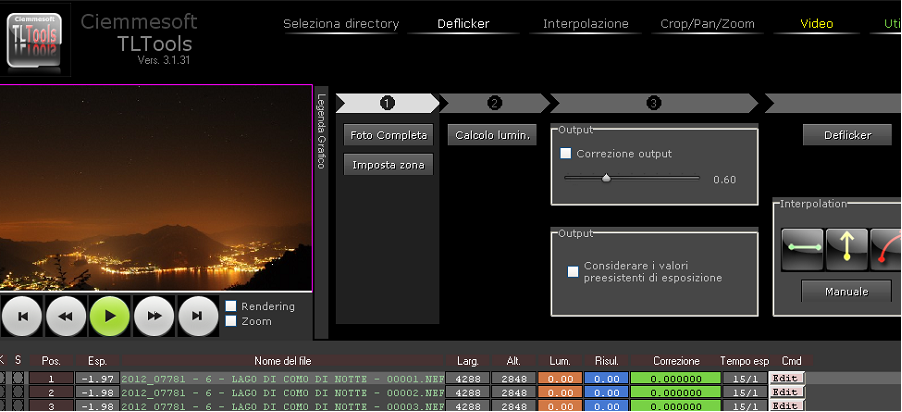
The program will calculate automatically the brightness of all frames and display this value in the column Lum. (orange column). It will show through a chart the performance of the same.
For most of the images is sufficient to make a calculation of the brightness of the entire picture. For others, however, it is convenient to define an area where you have to calculate the brightness.
It’s convenient to use an area of the image that is present in all frames (eg the sky) and is not modified by the inclusion, in the different frames of something alien (eg clouds, buildings, signs, etc. …). To verify and get a preview of the photos of the assembly, the program provides a kind of player (below the image). To define the area we have to press the button “Set Zone”.
The creation of a zone is intuitive. Just use the mouse to draw the rectangle to be considered as zone. We can do so that the rectangle that defines the area, follow the same area in the case in which the part of the picture is not in a fixed position. To do this simply go to the last frame here and draw the new rectangle in the new portion of the photo. If we want to go back to using any photo for calculating the brightness we can use the “Photo Finish”.
Keyframes
If we have created an area to calculate the brightness, perhaps you noticed that the program has added some white dots in the image list. These pellets are used to identify the frame as a keyframe.
What does this mean? It means that the frame is an initial state, final or intermediate processing. It is the task of the program to calculate, in the intermediate frames, the values needed to have a gradual change between two Keyframes.
In the previous case (the definition of the area to calculate the luminosity), the program has defined the initial state in frame one and the final state in the last frame. He finally calculated all the intermediate values. If we did not define a new rectangle in the last (or other) frame, all values will be the same for all frames.
Deflicker
After calculating the brightness, we can make the program calculate the exposure value from LR to suggest to make uniform brightness. To do this simply press the button Deflicker.
If you have done this calculation, the chart will get these values.
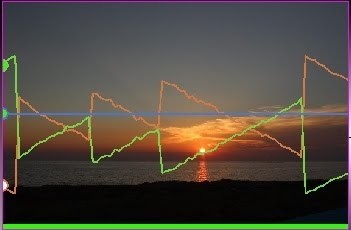
- The orange line indicates the trend of the brightness in the original frames.
- The green line indicates the trend of the correction to be applied to even out the brightness value. ( This trend tend to be a mirror image of the brightness)
- The blue line, however, is the result of correction (more uniform this line, the better the deflicker of the photos is)
In the graph can also be present other symbols.
- The dots in the three lines described above indicate that the frame is now displayed in the preview.
- The white dotted line indicates that the frame is a keyframe.
- The line below (which can be of different colours) indicates the type of formula used for the calculation of the correction (see later) .
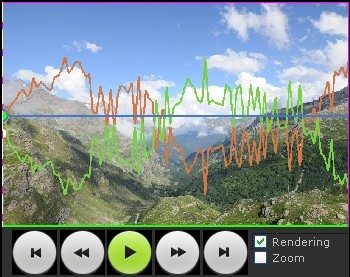
We can now see a preview of the work done by the program. To see this preview, we can take advantage of the players in the program.
Warning! The preview displayed by the program is only an approximation of the final result. The end result created with LR might be quite different. If you wish to create the video directly from the program, the preview is pretty indicative of what we will get.
In the event that the outcome of final render does not satisfy us (be careful, the one done from LR and not a preview of the program), you should change the parameter correction output.
If the sequence of images are very large and sudden changes in brightness (differences between two adjacent frames greater than 5), the program can give unsatisfactory results.
We can solve the problem by changing the magnitude of the change suggested by the program.
To do this we can use the controller Correcting Output.
We select a desired value (if the changes are approximately 5/6 units, then it is recommended a value of about 0.6. If they are even more it is recommended then a value of about 0.5. Do not go over with this value). The program reports these possible problems via an icon (yellow triangle)
We enable this feature by checking the corresponding checkbox (Correcting output).
Once the desired value is selected, it is possible to recalculate the values by pressing Deflick.
In the event that we had already made changes to exposure via the LR program, we can tell the program to take account of these values. The program will add value to the existing values calculated.
To do this you can use the checkbox “considers the existing values of exposure”
Save your work
Once the operation of deflicker is done, we must “communicate” in LR the values to be used to perform the operation. To do this we use the metadata. We therefore need to overwrite the metadata, with values suggested by the program.
After the operation of deflicker, the program will show a button in the lower right (“Save XMP”). Just press this button and the program will save the data.
Let’s go back to Lightroom
At this point we can return to LR and re-select all the photos (CTRL + A).
Press the right mouse button and in the menu that appears, navigate to and select Metadata.
This time we have to select “Reload metadata”.
At this point LR will load the new metadata with values suggested by the program TLTools and if we export the photos to create the videos, or use the same LR to create the video (by the way the program can create for you the templates required for HD) we will see the result of our work.
This shown is just one of many possibilities made available by the program.
In the next tutorial, we will see:
- How to remove the steps of brightness (typical of when during a TL session parameters have been modified like ISO, exposure time, aperture, etc..)
- Arrange a session done with Magic Lantern
- Fix a dato night shooting or night to day
- Create a profile specifically for our special photo
- Simulate camera movement
- Interpolation of photo parameters
- Create videos directly from the program
- Apply filters to images
- Creating startrails directly from the program etc..
Please note that this tool is NOT supported at the moment in English, although Mauro is doing an amazing job keeping it always up to date and feature-rich!
Thanks
I want to personally thank once again Mamo AKA Mauro for his infinite patience and willingness to serve all.
