Award Winning Time-lapse Photographer and Emmy Recipient for Underwater Cinematography, Mark Thorpe explains how to create a motion urban time-lapse from day to night using Syrp Genie.
Who's Mark Thorpe?
Beginning his career in underwater imaging, Mark went on to win an Emmy for his work on the National Geographic series 'Great Migrations'. His love of the natural world continues to direct his film and photographic projects, however a move to Japan has seen him take on the challenge of documenting its vibrant cityscapes.
Visit his website at www.seawildearth.com
This detailed Day-to-Night Traffic Timelapse video tutorial includes Mark's tips for finding the right location, setting up your equipment, including motion control, and how to take your freshly shot timelapse through the editing process in Adobe Lightroom and LRTimelapse Pro.Please note that the below is the adapted video transcript from Mark Thorpe's / Syrp video tutorial, which is published upon Syrp's authorisation and courtesy.
How to Setup a Motion Day-to-Night Traffic Timelapse
Hi, folks. Welcome to Yokohama in Japan. I'm Mark from SEAWILDEARTH.
Tonight I'm going to be showing you how I shoot urban time-lapse going from the daylight to a nocturnal setting using the Genie mini from Syrp, at an intersection that is not too far away from here.
I'm going to be using a Canon 5D Mark III. I've got no straps on it. Even in the urban environment, there is wind, there's vibration on that strap, and I don't want to use that on a time-lapse because it may be too fragile.
 When doing a urban timelapse, use your camera without straps
In conjunction with a Canon 5D Mark III, I'm going to be using my favorite wide lens. It's the Nikon 14-24mm f/2.8G ED AF-S. I need to have and I do have here a non-reflex adapter where my aperture control is, just this little blue lever that you can see here.
Choosing the Location for your urban time-lapse
Now, this brings us onto our first point is the location. What we want to try and do is get the effect where we've got a 2.5 second shutter so we get a nice streaming effect of headlights.
At street level, I don't know if you're going to be able to get. You're going to get traffic stopping here, You're going to get traffic stopping there. Even though our interval is going to make all of that gel together, I think the true dynamic comes from when you got many different directions all moving together.
 How the true dynamic in a urban traffic time-lapse can be rendered: location scouting really matters
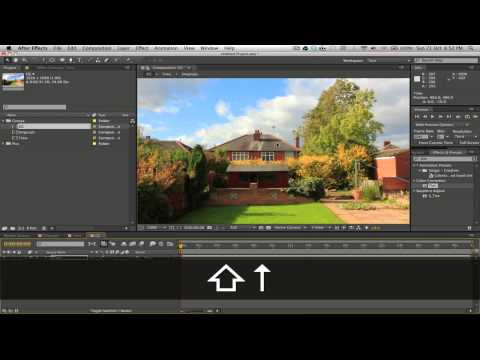
What I have noticed in this location there's an elevated place and I think it's probably going to be pretty cool to shoot from up there. It's going to allow us the freedom to shoot a really nice wide open scene and get this whole dynamic of this crossroads here.
I've got my tripod set up already. Just going to grab the Syrp Genie mini. That then is just going to screw directly onto my tripod. I've got my ball-head. That goes on here.
Let's get the camera sorted out.
Urban Time-Lapse and Camera Settings: White Balance, f/stop, Shutterspeed, ISO and Focus
I'm on f/8. The first thing I'm going to do is I'm going to set my white balance. At the moment you'll see I'm on cloud white balance. I don't want to have a default setting on it. I'm going to go into my white balance.
I'm going to select that and I'm going to scroll through to kelvin, and you'll see that kelvin at the moment is going to be a characteristic of 5,300. That is a daylight setting and that generally tends to be a little bit too warm for night time.
In the higher numbers of your kelvin is a warmer color, more orange-yellow. If you go down to a lower numerical factor, you're going to get a colder bluer color.
The reason I do that is because I want to try and override the overbearing yellow and orange tinge that you get from neon street lights etc. at nighttime. Just to reduce that, I'm going to come down to a kelvin of 3,300. That I found over a period of time generally tends to be the best kelvin for urban time-lapse.
 Choosing the best colour temperature for night traffic time-lapse
I'm going to now set focus.
The way that I'll do that is live view. I can choose an area of high contrast, go to expanded focus on the Canon. I'll use the zebra of the crossing and the cars to set my focus.
Once I'm set and I'm happy, I then come out of live view and that's my focus done.
 Prepare for shooting: choose an area of high contrast, use the expanded focus
Next thing I'm going to format my card just so I know that I've got a nice clean card to start with. You'll notice that I'm shooting raw. This way for the editing I've got more leeway.
Next thing is ISO. At the moment it's showing 400. I want to be lower than that. I'm going to come down to 100. Bearing in mind that I've got a small aperture with ISO 100, which means my shutter speed's going to be slow in the beginning, and I'm targeting to get a shutter speed of around 2.5 seconds in order to get that really nice streaky effect. I think we're good to go.
Now that the camera is set up, I'm going to turn the Syrp Genie on, fire up the app. The first thing I need to do is I need to pair the Genie with my iPhone.
On the connect in the top right-hand corner you'll get this little circle, and by clicking that it's going to search for the Genie mini. It's got that. We've got the green, you press okay.
You have then the selection new-time-lapse or a pre-set. I'm going to go new-time-lapse, top left-hand corner, record time.
 Pairing the Syrp Genie with your iPhone, and starting a new time-lapse
This is the amount of time that you're on site. If I'm going to shoot 40 minutes, that's what I want to put in the record time. Playtime is the amount of physical time that sequence is going to play on the screen. If it's going to run for 12 seconds, 15, or 18 seconds, that will be shown in your play time. The interval quite simply is the interval between your shots.
Now, when you plan an interval, you have to think about how your time-lapse is going to run. I want to hit a maximum shutter speed of about 2.5 seconds, and the reason is because I want to have that very nice blurred line effect with the lights of the cars just to create that passage of time sensation of a time-lapse. 5 seconds is enough.
It allows me to have a 2.5-second shutter. It allows the data to be written to the card and it then prepares the camera for the next shot. I like to round the interval at 5 seconds.
 Choosing the best interval for your urban traffic time-lapse is essential
Setting up the Syrp Genie Movement: Start Point, Movement and Preview
What I can then do is set my motion.
Let's go into live view. We can see what the view of my camera is right now. If I drag, you can see I'm going to set my start point, and my start point is going to be somewhere like that. I'm happy with that.
What we can do now is we can just press play, and this is going to give me now a real-time view of the motion that I'm going to get throughout the sequence of this time-lapse.
If at this time I find my planned travel is too little, which I believe it is, I can go into there and I can increase or decrease it as I wish. I just added another 6 degrees and I'm happy with that.
 Plan your Syrp's Genie movements in advance
I'm happy with the start point, I'm happy with the end point. That's going to be my time-lapse. All I need to do now, record, there's my first frame.
Now I'm just going to wait for the time-lapse to run its course, and during that time I'm going to manually run through shutter speed and ISO to maintain exposure throughout the time-lapse.
As you can see now, I've got the problem where I need to crank up my shutter speed because I'm dropping down the metering showing me that I'm underexposed.
All I have to do is I have to coordinate that time with when I'm shooting. I've cranked up 2 seconds. It's still showing me that I'm under. Wait for another shot or two to take when you're comfortable. There we go, now we're on 2.5 seconds.
You can see that we're still a little bit underexposed, so what I'm going to do now is I'm going to manually ramp the ISO. Again, I have to coordinate that with the time when I'm not shooting.
Now we're on 320. Then throughout the duration of the time-lapse, I just monitor that and make sure that I maintain the metering on the camera.
Urban Time-Lapse Video Post-Production
Creating Keyframes in LRTimelapse Pro
Okay, so for editing I've come back from my time-lapse shoot. I'm going to use Adobe Lightroom and LRTimelapse Pro for editing. Here on the left-hand side, I have my root directory.
I've selected the folder that contains all of the images from the shoot. It's 720 frames that I shot for this time-lapse.
 Creating Keyframes in LRTimelapse Pro
Now what LRTimelapse allows me to do is to create key-frames which are indicated by these three marks here.
If I show everything, don't worry about all these lines, but these blue indicators here, one, two, three, four, these are my key frames and these are also shown on this column here.
There's my second key frame, my third key frame, again, in blue, and my last key frame down here corresponding with this one here.
 Keyframe Adjustments in Adobe Lightroom
Now, in this main pane, here you can see all of the parameters and settings of each one of the images that make up this time-lapse. Now, with LRTimelapse, what this enables you to do, as I mentioned, is to create these key frames, which are then recognized when you take the sequence through to Adobe Lightroom.
Now, with Adobe Lightroom, you import the whole sequence as individual files as they were shot on your camera, and each of the key frames are indicated here with four stars. Now, to make your editing a lot easier down here on the right-hand side, there is a filter where you can select just the key frames. Here are my four key frames here, one, two, three, four.
Now, as you can see, I've already edited these, but I'm just going to run through the way of doing that here:
- You select your first key frame
- you edit it how you like
- You crop it
- You change all of the aesthetic
- .. and then you go back to library.
Syncronising Keyframe Adjustment Settings in Lightroom
Now, except for the crop, what you then do is you select all of the images. Up here you have this squid to synchronize the settings on each key frame. By running that you then administer the settings that you've just edited on your first key frame to the remaining three key frames, so these three here. That gives you then a benchmark beginning on the aesthetic of each key frame to then go in and edit that.
This now being my second key frame. I've got all of the settings that I've put in from the first key frames so I know this is my benchmark stop point. If I need to make any particular changes and adjustments here, this is where I'll do it.
Once I've done that and I'm happy, I will then go out to library again. I will select the last two key frames and I will again run that script. I'll then choose my third key frame, go back to develop.
Again, my start point here are the settings from the second key frame. From there I edit, so on so forth, back to library. Choose my last key frame, run the script. Once I've done that I go into develop. I will develop that to get my final look.
Now, this is the final look. I'm happy with my edit.
There's one thing that that script doesn't control and the is the crop. I normally edit everything first and then I'll go back to my first key frame, go back to develop. I'll open up the crop. This is the crop area that I want and this is the crop that I've carried across to the other side. I'm not going to change this but if I wanted to I could adjust it however I wanted it. I'm happy with that. You click out of there.
In order to carry the crop across, you come up to settings, copy settings, and you disable everything apart from process version and calibration, which are to do with the lens profiles and camera profiles. You only leave the crop settings, everything else you disable. You only enable the crop aspect.
From there you copy. You know what I'm going to do, I'm going to come out to library. I'm going to come into this one, develop, settings, past settings. That then is going to transfer my crop and apply to this image. Go to the library, do the same with the third and with the fourth key frame.
 Save metadata to files in Lightroom, before going back to LRTimelapse
Once you've got all of your four key frames edited, you select of them. Because you've made changes you come up here to metadata, save metadata to files. From there it's going to administer all of the changes, and edits, and crops that you've edited into these key frames and store that in the metadata.
Autotransition Keyframe Adjustments in LRTimelapse Pro
What I normally then like to do is to come back to LRTimelapse Pro. Here we are.
When I come back to here, what happens here I reload the sequence because I've got to now take into account all of the changes that have been made with regard to the key frames. Then what I do is I will apply and auto-transition between those key frames.
Now, an auto-transition, what's that going to do is it's going to program the incremental changes that are needed for each frame between the key frames in order for them to adopt the transition between the look that you've edited from one key frame to the next.
 How to remove flickering using LRTimelapse
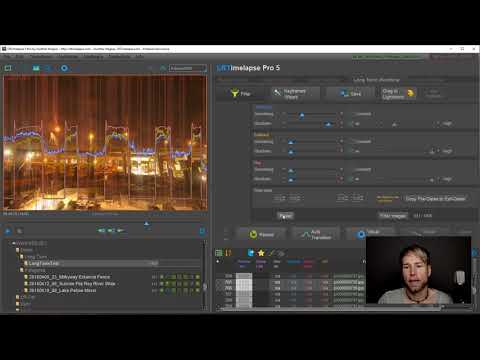
Once you've accomplished that, you save all of the information, and then you come down to your visual previews.
Now, the visual preview is shown here in these graphs. The first run-through, the main visual is indicated by this pink line here. Now, normally this should be a little bit more jagged than is shown in this image, and the reason why it is a lot smoother is because once I've run that initial visual preview, I've run a visual de-flicker.
De-Flickering and Exporting the final sequence
What that does is it will take out any remaining nuances that may be associated with flicker that were generated due to the changing of the shutter speed and the ISO throughout the shooting of my time-lapse.
What that does it just irons everything out. It creates this really nice smooth line, and now you can see if you run it here, you can see that there's no real flickers and horrible light bumps and changes throughout the course of the time-lapse, and it just allows you to find the point where you're happy with it because you can go back and change that if you need to.
If you don't need to do that, just save that.
 Final step: back to Adobe Lightroom and Export the final time-lapse sequence
You then go back to Adobe Lightroom. You select everything, edit, select all, and then you export using the LRTimelapse plugin.
You can export in 4K to JPEG, or you can go in 8 bit TIFFs or even 16 bit TIFFs, but obviously bearing in mind that's going to increase the size of your photo file. You then decide where it is you want to store that file that LRTimelapse will then use to create the final video file. You set your directory, press export, and then once you've exported everything from Lightroom, you'll be finished with Lightroom.
Come back into LRTimelapse, and you will get a little dialog box that will then pop up and ask you how it is you want to save your final video file. That is a very quick run-through of my edit. I'll leave it there.
I hope you enjoyed this video as much as I've been shooting.
Cheers guys, see you soon.
Mark