Astrophotography is one of the most spectacular forms of photography there is. Learn how to do it and add motion to it from the award winning photographer and time-lapse filmmaker Mark Gee.
Mark's love of the New Zealand landscape is a big part of the inspiration for his photography.
In this Star Timelapse tutorial you'll learn how to setup a motion control timelapse using the Syrp Genie and Magic Carpet. This guide to Astro Timelapse covers everything from location scouting to camera setup and includes a detailed section on post production using Adobe Lightroom and LRTimelapse.Please note that the below is the adapted video transcript from Mark Gee's / Syrp video tutorial, which is published upon Syrp's authorisation and courtesy.
Motion star time-lapse workflow: a complete step-by-step guide
Hi, guys. Mark Gee from The Art of Night here.
Astrophotography is one of the most spectacular forms of photography there is. When you add motion to it by shooting time-lapse, you can catch these amazing visuals of the rotating night sky above dreamy landscapes.
Today, I'm going to show you:
- How to set up and shoot an astro time-lapse using the Syrp Genie and Magic Carpet slider
- Take the images into Adobe Lightroom for processing
- Export a movie by LRTimelapse
Astro time-lapse how to: Location Scouting, Mobile Apps and Composition
Now, before we get into that, I want to talk a bit about scouting for locations and the apps that can help you plan your astro shoot. When looking for a location, I tend to look for areas with good foreground interests.
 Scouting for astro time-lapse locations
It's very similar when planning for a landscape shoot, really.
Rock formations, interesting trees you can silhouette against the night sky and waterways that can catch the reflections of the stars always make for good subjects.
You then want to compose your shoots with the night sky in mind. The bright galactic center of the Milky Way is a favorite of mine to use in compositions to complement the landscape.
I spend a lot of time planning my shots with some helpful apps to get the perfect positioning and time. The best time to shoot the Milky Way is during the new moon period when there is no moon in the sky.
I use an app called PhotoPills, which has a number of super helpful tools, including a comprehensive moon calendar and a 2D Milky Way planner, so you can see the positioning of the Milky Way at any given time in the location of your choice.
 Planning your shooting session with the help of apps: Photopills
Another app I use, which complements PhotoPills, is called Star Walk.
This app harnesses your phone's GPS capabilities to present an onscreen view of what the stars and constellation should be visible on a clear night from your current location.
You can also point it up at the night sky for augmented star gazing.
 Planning your shooting session with the help of apps: Starwalk 2
If I haven't shot at a location before, I tend to arrive in the day time to set up as it's always good to allow yourself a good amount of time before your planned shoots begin.
Setting up can take a lot longer than you anticipate sometimes, especially when it comes to lighting up your compositions and getting the camera set up just right.
I've been in situations in the past where I've taken longer than expected to set up and missed the shot because I simply wasn't ready when the Milky Way was in the optimal position in the sky.
I'm just about set up now.
In this scenario, we have a Syrp Genie, which acts as both our motor and our intervalometer attached to a Magic Carpet slider so we're performing a linear movement. I've been using the Syrp Genie for a while now and I found it as a simple, portable and easy to set up solution for my time-lapse needs.
 Setting up your equipment for your time-lapse shooting session
Camera setup, Image Quality, Shutter, Aperture, ISO and Focus in Astro time-lapse making
Today, I'm shooting the time-lapse with a Canon 6D and a 14 millimeter lens.
There's a number of things I want to set on this camera first to make sure we get the perfect time-lapse:
- I need to make sure I shoot in RAW, so I have uncompressed images to work with in post-processing later.
- Make sure that the long exposure noise reduction is turned off. With this setting on, it will double your exposure time, which you don't want for a time-lapse, and instead we'll be using noise reduction in post-processing.
 Make sure noise reduction is turned off when setting up your camera
Then:
- Check that auto image review is turned off. It will save power on your battery, and you won't need it during your time-lapse.
- It's best to set your white balance to one of the presets on your camera. For astrophotography, I generally use the tungsten or incandescent preset. Since we are shooting in RAW, we can change the color temperature afterwards in post-processing.
- You want to set your camera to manual focus. If you are setting your time-lapse up during the day, you could set your autofocus to focus your lens on a distant object and then lock the focus off by setting it to manual.
- Next we need to set the exposure for your time-lapse. When shooting in a dark environment away from city lights with a 14 millimeter lens, I generally set my shutter to 30 seconds with an aperture of f/2.8 and an ISO of 3200. These values will vary depending on the camera and lens that you're using and also the environment that you're shooting.
How to avoid star trailing when creating astro time-lapses
A good way to determine your shutter speed to prevent star trailing is by using the 500 rule. For a full frame sensor on a camera like a Canon 6D, you simply divide 500 by the focal length of your lens.
For example, if I was using a 24 millimeter lens, I'd take 500 and divide that by 24, which would give me 20.8. Rounding that down, that will give me a shutter speed of 20 seconds.
For your aperture, it's best practice to open your aperture right up and set it to the lowest f-number on your lens as we need as much light to pass through the lens as possible.
For ISO, I generally set that between 3200 and 6400, but not all cameras can handle high ISOs as well as others and will give you a noisy image. I recommend you start from ISO 1600 and work your way up from there.
Setup the Genie, Rec Time, Interval, Play Time to add motion to your astro time-lapse
Now, that the image is exposed, you need to figure out your shooting and movement parameters.
When shooting motion time-lapse at night, it's important that your Syrp uses the move-shoot-move sequence because it allows the camera to come to a complete stop before firing the shutter so your image is razor sharp afterwards.
Now, we want to set up our timing parameters that is to say how long I want to shoot for, record time, how often I want to take my photo, the interval, and how long do I want my final time-lapse to be, the play time.
The first thing we do is set the interval, that is how long the wait time should be between each movement. As a general rule, you should set the interval five seconds longer than the exposure time.
 How to Setup the Syrp Genie for your astro time-lapse sequence
How the interval works
Let's take a closer look at what is encompassed in the interval. We already know we have a 30 second exposure. If we set our interval to 30 seconds, we still won't leave enough time for everything else to happen.
The first thing we need to allow for is the move shoot delay, which is the time between when the motor stops moving and the shutter fires. This is set by default at 400 milliseconds.
You never really need to worry about this changing but it's in there because, on really unstable setups such as cable cams, it's useful to increase this so that any shake occurring from the movement is eliminated. Then we have our 30 seconds exposure time.
Following this, we need to leave enough time for the image to save on to the card, which shouldn't be more than three seconds. In total, we have about 33.4 seconds. To be safe, we'll apply the five second rule and set the interval at 35 seconds.
 Setting up the interval
Now that we have the interval set, we want to set the record time and the play time. These two values are interdependent on each other. If we start to increase the record time, we notice that our final compiled time-lapse will also increase.
Usually it's good to have about 15 to 20 seconds of footage at the end. This way, it gives you plenty of room to get rid of frames later to speed up the time-lapse and gives you enough footage to pull the in and out points later as well.
Setup the movement on Syrp Genie: Movement length, Ease in / out
Now, we should set up the linear movements so we get a nice move slide across the foreground object. I already know that I can drive 1.4 meters along this track so I programmed it for 1.4 meters.
I'm almost ready to go but I want to set the ease in and out on the Genie, so I can rent the movement in and out. By changing the ease to 4 seconds, I'm effectively adding a slow four second ramp to the start of my time-lapse and the slow dampening of the speed at the end which is a really nice effect.
 All is set-up now for the astro time-lapse shooting
Astro time-lapse video: the Post Production
Now, you've captured your time-lapse. It's time for us to process the images and put a movie together.
Introduction to Milky Way shots and Lightroom-LRTimelapse workflow
I'll be doing that work in Adobe Lightroom. Then we'll be exporting it via LRTimelapse.
Now, if you're serious about doing lots of time-lapse work, I highly recommend getting LRTimelapse as part of your tool set. It provides the most comprehensive solution as far as I'm concerned for time-lapse editing, key framing, grading, rendering and it's fantastic for smoothing out the exposure changes when you're processing those day to night, night to day time-lapses.
KNOW MOREDiscover how LRTimelapse works and how you can benefit from it by reading our free tutorial Basic Workflow for time-lapse processing with LRTimelapse!
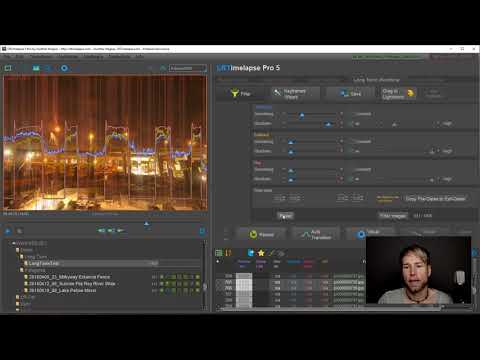
Now, let's get started with this time-lapse here. I've already imported the RAW images from a time-lapse that I shot last year. I thought I'd show you the processing on this one as I get a lot of questions to how I manage to shoot the campfire and the Milky Way in one exposure.
The real secret of it is it wasn't much of a campfire, really. It was just glowing coals and every now, and then I would stoke the fire and get these sparks coming out of it. It wasn't much to it at all, really.
 Milky Way photos and astro time-lapse Post Production Workflow using Lightroom plus LRTimelapse
With astrophotography, processing tends to be a very personal and subjective thing.
I generally try and keep a natural look about my images, but also some others like to push the boundaries a little bit and produce bolder, more intense results.
When doing time-lapses, I recommend that you do keep your processing to a minimum for a more natural result. If you begin to push the boundaries too much, you're going to end up with artifacts in your time-lapse, which isn't a great thing all the time.
Astrophotography in Lightroom: Color adjustments and neutralising the image
When I start processing these images, the first thing I like to do with an image is to get the whole image neutral in color and balanced out.
Let's go in and we'll pick an image with the Milky Way is a little hard on the sky. I think up about here we'll find something. I've got some sparks here.
This is probably a good one actually. Let's go over this one here:
 Choose an image with the Milky Way, and start working on it in Lightroom
Let's jump into the develop module in Lightroom here.
The first thing I like to do is neutralize the image as far as the white balance is concerned. Now, it's a little blue and I want to just get a little neutral. Somewhere around here on three some hundred mark, it looks about right.
Now, if you're not sure what I mean neutral ... If I swing it this way, it's way too blue. If I swing it that way, it's way too yellow. Something in between is fairly neutral.
A good way to test that and see if you are getting neutral is just pump up that saturation slider right to 100% and then you can see. There you can see it's just way too blue. You don't get the color contrast in the image. If I go too far, it's too warm. There's even green in there as well. You can see somewhere in there is pretty good. I'm going to go with that for now.
Then you just swing your saturation back to zero again. There we go. We've got a bit of a neutral image now.
Lens Correction in Lightroom
Now, we need to go down and I always like to get the lens corrections right.
I have a profile here for my Canon 14mm lens, which I shot this time-lapse on. I'm just going to enable those profiles and remove the chromatic aberration here as well.
What you can see is it removes the vignetting on the end which is caused by the lens. Sometimes with Canon and other cameras, it does a little too much so you can swing over to here into the manual area.
With the lens vignetting, you can just add a little more in. You don't want to go too far because you can see that's probably too much.
Set black and white points in Lightroom
Now, I've got my image balanced. As far as the white balance and the lens correction, I like to go into my basic settings here and set my white and black point.
A good way of doing that is if you hold down your option key and here on the slider, you can see if you go too far or not too far ... At the moment, I can see that I'm clipping around this fire area here which is fine. It doesn't make much of a difference to the image. I like to get just a few stars in the sky.
 Set black and white points when post-producing night images
With my white point, I'd say I'm going to leave it where it was because it's a pretty good balance.
Let's have a look at the black point now. You can see that there's way too much blacking. You're clipping on there. Let's push it a little bit further, and I'll even push it, once that yellow is kind of gone, to about 25. That looks pretty good.
Color adjustment in Lightroom: Clarity and Tone Curve
It's a very flat-looking image at the moment, but we're going to do our processing and get some pop happening in here and making it look good. I'll go in and add a little pop.
By doing that, I usually go down with the clarity here. Now, word of warning on the clarity slider here is you can do some crazy things like that but that's really breaking your image. It's not so bad here but generally if you'd push your clarity to 100%, you're going to start getting haloing around the edges of where the contrast is, the darks and the lights. We have this image. It's not too bad. We'll just pull it back a bit because that's just too much.
You'll also introduce other artifacts like noise and you could see down here that you're getting this purple artifact, and it's introducing a lot more noise. I'll come back to about the 20 mark. I think that's enough clarity. It just lifts it up a little bit and that's all we need to do.
Now, I'd like to go and adjust the tone curve.
It's a global adjustment again. If you go in here in your tone curve here, I usually play with the lights and darks. I don't go too overboard but let's see how it looks. If I lift the lights up here, you can see it's going to lift that Milky Way.
You don't want to go too far because you're going to start getting too much clipping, especially with this fire here. I think I'll drop it back to around about 35 looks pretty good.
You can tell with the clipping as well if you hold your little mouse over the histogram, you can see exactly where it's clipping. We can see that it's clipping on the fire but nowhere else.
You can also do it with the blacks. At the moment, we haven't adjusted the blacks completely but there's no clipping there so we're pretty safe.
I think I want to add a little more shadow to this image.
Let's just pull these blacks back a little bit. Somewhere about there is starting to look good. I think it's looking pretty good but also when I did the white balance, it seems to have a little too much grain in the image now.
Let's go back up to the white balance here, and let's have a look and let's cool it down a little bit. I will just grab that tint and just pull it back a bit. Now, you can see it's getting a little more blue, a little more natural look about it. When I shot this, I shot it around on tungsten preset on my camera which is 3200. That's it there. That's a little blue for me so I'm going to go to say close to let's say 3500. Let's see what that looks like. That's looking pretty good now.
There's still a little grain so you can also tint it as well. Let's up this tint towards magenta a touch. There we go. Just bring up the 15 there. It's just looking a lot more natural and looking good.
 Color adjustment, Clarity and Tone Curve
Local Sky Adjustments and Graduated Ramp in Lightroom for Milky Way shots
I've done my global adjustments to my campfire Milky Way shot. Now, I will go and start doing some local adjustments.
I usually use the wrap tool to do that, especially for the sky. What we're going to do now is add a graduated ramp through here. We can pull it down like that. We can start there. What I want to do now is with this ramp is add some contrast. We should highlight a bit. Play with the whites and the shadows.
Let's go for some contrast first.
We'll just crank that up. I always like to have my sky a little darker at the top of the sky because it is nighttime after all. Somewhere around there is looking pretty good.
Now, I just want to kick some of these highlights a little more in the sky especially, so I'm going to push those a bit further. I don't want to go too far. I'll go back to somewhere around there looks pretty good.
I want to get some shadows back in here, too, because I just want to try and get a little bit more darkness up at the top of the sky here. I'll go back down to my shadows.
Remember, this is local adjustment. This is a ramp adjustment so you're not actually adjusting overall. Let's push that down to about there. If you hold your mouse over the ramp, you can see what it's affecting with the red mask there. That's looking pretty good.
Now, let's pump some white here so we can get a little bit more clarity out of the Milky Way core here and the stars. I will start to push the whites a bit and see how far we can go without breaking anything. That's pretty forgiving here, so I can crank it right up somewhere around this mark here. That's looking pretty good. I'm going to pull it down here.
It's always good to have a look at your thumbnails, too, because you can see how the image is processing, looks as a thumbnail and that's a good way to see if you've got too much vignetting, or is it too bright in some spots or you're getting artifacts. I think that's looking good and we'll leave it at that.
Now, I want to get a little more attention on me and the campfire and the Milky Way here. I might just go back in and add a little bit more vignetting to the edges here.
Let's go back down into our lens corrections where we were and our lens vignetting. Then we can pull that down a little further. I would say you don't want to go too far because you can see, especially ... This is what I mean in the thumbnails here. You can see that we've got this vignetting on the edges here and it doesn't look fantastic. I'm going to pull that right back and sitting somewhere around negative 25 or so.
That's looking pretty good. I think I'll stay right about there.
Technical Clean-up: Noise Reduction and Artifact clean up
Now, we're almost done but I want to do a little technical cleanup now.
We'll need to do some noise reduction. I also noticed some purple artifacting down here in the corner here. I want to clean that up as well. What we're going to do is to clean this area up, we can go and get our radial filter up here. That one there. We just draw out a little radial area. Pull into our corner a little bit.
To do this, I usually reduce some of the saturations and take some of the exposure down. Let's do that now just to get rid of some of the purpling. You don't want to go fully black and white actually.
Our mask is inverse here so we want to go the other way. Down here, you can go into that mask. There you go. You can see the saturation is way too low. We just go somewhere about there. It gets rid of your purple, the purple artifacts there, and then we can pull the exposure down a touch as well. That's looking pretty good.
 Technical Clean-up: Noise Reduction, Artifact clean up
It seems a little noisy so I might want to just pull some of that noise back as well, too, just to help it out a bit.
Now, we would do a global noise reduction overall. We'll go down to do that. We need to go down to our details, which is right here. Now, noise reduction, it's quite tricky here.
We want to leave some detail on the image but we don't want too much noise, especially in time-lapse as it doesn't look great when all this noise is flickering all over the screen.
The best thing is to zoom right into an area where there's fair bit of noise. You can see in the sky here, and on me, and also in the ground area down here as well.
Let's go into luminance and we want to reduce that luminance noise reduction here. I usually work somewhere between 30 and 50. If look at 50 here, I can see that it's still reasonable. I still get a bit of detail out of it. If I push it way up to here, to a hundred, it just looks like plastic. It doesn't look good at all. It's that fine balance which you need to get.
I think I'll stick somewhere around ... Let's get 40. Let's see what that looks like. That's working pretty well. At the resolution that you'll see the time-lapse on, it'll filter out the extra noise here so I'm going to stick with that.
Now, I do see a little bit of the purple mottling that you get out of the color noise. The way we fix that, we can push our color noise reduction up a little bit. Because of the mottling here, we can just smooth it out. If we smooth out ... Pushing to a hundred is fine. You can see that kind of clean that up a fair bit as well.
How to sync color adjustments to all images in Lightroom
I think the image is looking pretty good now.
What we need to do, we've got all these other images which we need to sync our processing through. If you have a look at the before and after, you can see exactly what we've done here. I haven't pushed it too far.
It's still quite natural-looking but it just punches the Milky Way a little more. It doesn't go overboard with the coals or flame of the fire. I think it's going to work quite well.
If we come down here and we just select our image we just processed and then if you do CTRL+E to select all these images, we can then synchronize all these things together.
Now, you want to have all these settings, the parameters ticked because we're synchronizing all of them here. Let's hit the synchronize. That should do the trick.
You can see down here on the line that all of them updated. You can see here that I went a little crazy with my fire. That's quite extreme but as a time-lapse, I think that will read quite well. It's only a couple of frames but I think that will be okay. If you go up to the head of the shot here, that all looks good there. Then if I go way down to the end of the shot or I leave frame, that's all looking good as well. Fantastic.
Export all images to LRTimelapse
Now, what we need to do is export all the images and we're going to do that through LRTimelapse, the export module there. Once we've done that, we can create the final movie.
Make sure that you've got all your images selected down here. Then we can go up to our file. Go to file, export. You got all your export options up here, your email, hard drive. Because I have LRTimelapse, I have a export time-lapse module.
 Export all images to LRTimelapse
This is what I want. I just go for all the basics here, JPG, 8-bit is fine unless you want to do further color corrections. In that case, you might want to export it as 16-bit TIFFs. For this one, it's fine. I will call my sequence campfire under the Milky Way. All right. That's great.
Then all I need to do is hit export and prepares the export. What it does now is it goes through and it starts exporting all these images. Once you've rendered those 257 photos or however long your time-lapse is, it will open LRTimelapse and that's when we'll actually export the movie itself.
Export out a movie from LRTimelapse: the Codec and Output size
All of our images have exported from Lightroom. LRTimelapse is opened automatically as it does all the export module.
Now, it's pretty simple thing to do from here. All you need to do is just select your codec and your output size, your frame rate and your quality and away you go. There's a couple of other post-processing options there but I never use that.
When I'm editing my video, and I'm an editing on a Mac, so I usually export in Pro res all the time. Output size, you can get a 4K if you want but for this one, I am needing a 1080 HD version of it.
Speed, I usually do my frame rates 24, which is the same as film, and very high quality does the trick. All I need to do now is press the render video button and away it goes.
LRTimelapse has finished recording our movie so now let's open it up and have a look at it.