
Let’s face it, making and editing timelapse is a complicated and time consuming process. So when I found a little plugin that does its job automatically with the help of preset with less than five setting to adjust I’m a happy guy!
Today I’m going to talk about the one of this little gem called Flicker Free by Digital Anarchy. As its name indicates, Flicker Free is a plugin that removes the flicker from variety of footage including timelapse. It’s compatible with a broad range of NLE (After Effects, Premiere and Fincal Cut Pro and Avid).
Before going further, I must say that I have no affiliation of any kind with Digital Anarchy, I paid this software full price at $99 on their website. Talking about price, Flicker Free cost exactly the same as GBDeflicker which is commonly used by my fellow timelapsers.
How does Flicker Free works?
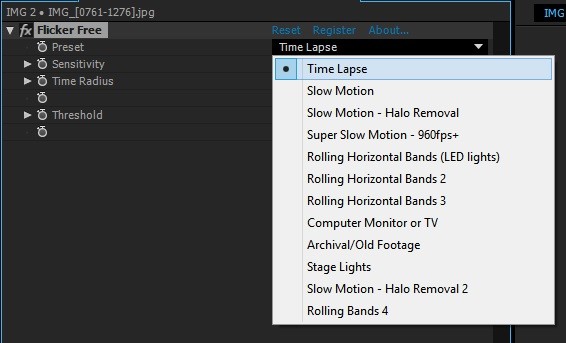
First, drop the effect on your track and then go to the preset selections. As you can see, Flicker Free offers a selection of various presets such as slow motion, old footage, TV monitor and timelapse to deal with different flicker situations. This makes it appealing if you are looking for more than a simple timelapse deflicker tool. I personally only used the Timelapse preset so far and it works great in most cases.
For most difficult footage, the user can tweak the settings. Good news or bad news, there are only three settings to play with and two options to check or uncheck.
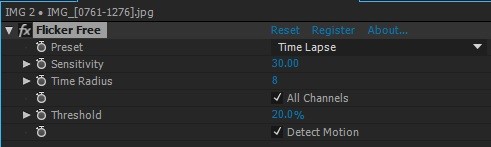
Flicker Free: Settings and Options
- Sensitivity
This affects how the flicker is removed. The number is going to tell Flicker Free how big the flicker area is. Let’s say that you frame a landscape with the sky taking 50% of your photo (so basically the horizon is in the middle). Now if you frame your shot with the sky being 90% or 20% of the photo, the sensitivity value would have to be increased or decreased accordingly. The timelapse preset gives a default sensitivity value of 20 but due to the nature of the Timelapse flicker (global exposure change) you may need to increase this value. - Time radius
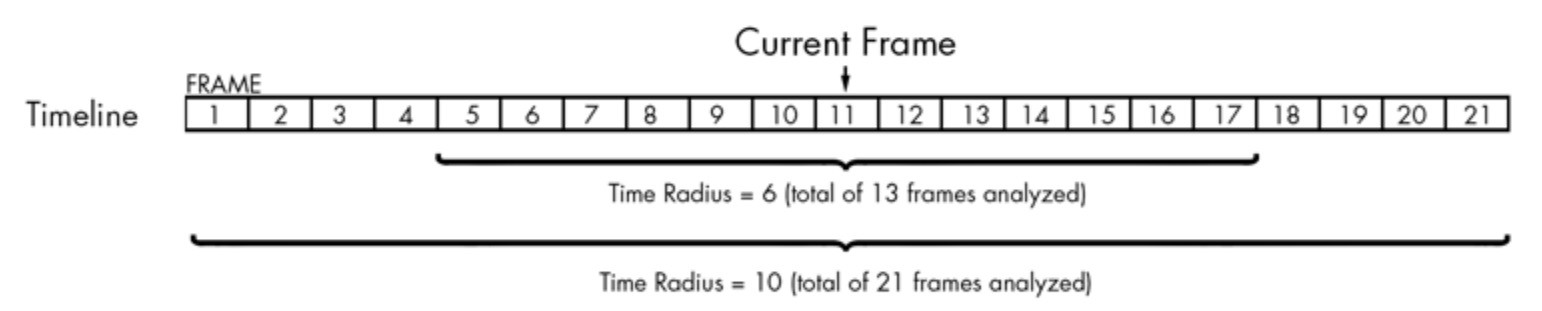
This value indicates the number or frames on each side of the current frame that flicker free is going to analyze. Set the value to 6 and the software will analyzed 6 frames before the current frame and 6 frames after for a total of 13 frames analyzed (6 before + 1 current + 6 after = 13). Basically, time radius weights the overall brightness and luminance value based on the number of reference frames (13 frames here) and will apply a positive or negative correction if necessary. More frames usually means better results but slower renders.
- All channels
This option should always be on. It allows the software to analyze the RGB channel individually for better results. There are some speed/memory benefits to it being off, but they are small. - Detect Motion
With this turned on, Flicker Free will analyzes the footage for pixels that seem to be moving. This helps to prevent artifacts and “haloing” which can sometimes occur with this off.
The downside is that the flicker removal may not be as good but timelapse usually involve the capture of dynamic scenes so this option should be turn ON. - Caches Frame
This only appears in the Final Cut Pro version of Flicker Free. This should be turned on as it allows the software to cache the frames and drastically speeds up rendering. It’s helpful not to have to ask for 21 frames on every frame. If they’re cached then for each new frame we only need to ask for one additional frame to add to the cache. Some host apps (e.g. After Effects) already have good caching and don’t require this.
Flicker Free Vs LRTimelapse and GBDeflicker
I haven’t used GBDeflicker so I’m not qualified to do a fair comparison between these two plugins but unlike GBDeflicker, Flicker Free is compatible with Final Cut Pro and Avid.
What about LRTtimelapse? This software is great and an absolute must have for any serious timelapser but it can’t be compared to Flicker Free or GBDeflicker.
LRTimelapse is more advanced, workflow intensive and expensive. It also allows to key frame many parameters of a timelapse sequence such as white balance, contrast and saturation. I usually apply the Flicker Free on regular timelapse sequence and keep LRTtimelapse for more advanced case such as Holy Grail or when I need to key frame some parameters. I sometime also apply Flicker Free on a sequence generated by LRTtimelapse to smooth out the last bit of flicker if necessary.
Conclusion
Flicker Free is a nice little plugin, compatible with the main NLE on PC and MAC.
Available at U$D99, it is well priced in my opinion. It offers various preset among which a deflicker preset for Timelapse. As with all software, flicker free is no magic and can sometime fail in his task but I’ve been mostly satisfied with the results.
Last, Flicker Free is very easy to use and doesn’t require to go over many settings and parameters to get it right. Even though I cannot talk about GBDeflicker, the Flicker Free developers have done a good job to make their plugin simple and effective.
More information at Flicker Free product page.
Videos
Flicker Free Demo Reel
Flicker Free After Effects Plugin Tutorial
Introduction to Flicker Free for Adobe Premiere Pro
