Second part of the exclusive tutorial dedicated to time-lapse processing with LRTimelapse by Gunther Wegner, which in this part will cover:
- Auto Transition and Save
- Load the complete sequence in Lightroom
- Render the sequence with the LRT Export Plugin
- Render intermediary video sequence
If you missed the first part, we recommend that you read the Basic Workflow for time lapse processing with LRTimelapse.
Let’s continue now with the auto transition step of the workflow..
6. Auto transition
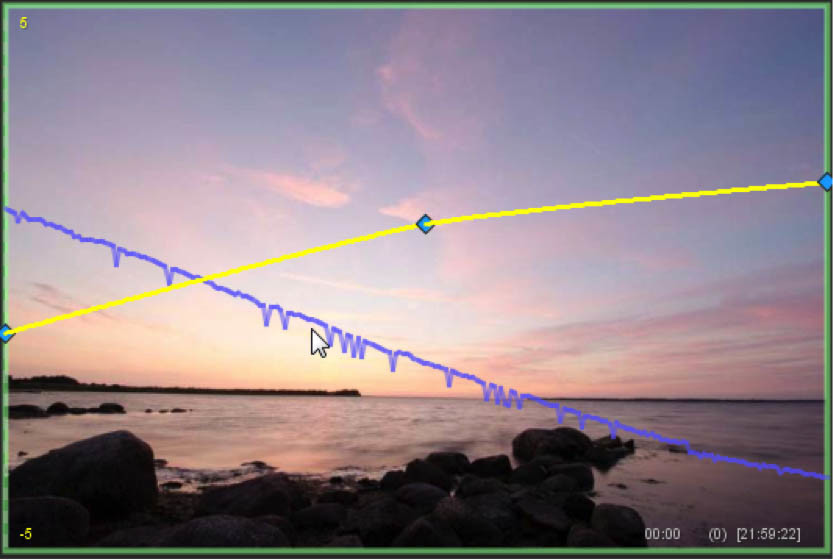
Click on Auto transition and LRTimelapse will automatically calculate the development-settings for the intermediary images to create smooth transitions between the keyframes.
Again, you’ll be able to see the changes in the table as well as in the preview graphic.

If you press the button for ALL above the preview, all parameters that you have modified in Lightroom will be displayed, superimposed over the preview image.
Be advised that your modifications will not be visible as ‘real time’ preview in the LRTimelapse preview. As before, the preview will only display the original, unedited version, not the one developed in Lightroom. This is primarily due to reasons of working speed.
For all practical purposes, showing a ‘real time’ preview in LRTimelapse would hardly be relevant. You can see the visual edits in Lightroom and count on LRTimelapse to handle the intermediary values.
You’ll soon see that a faster workflow is clearly more important that an exact preview in LRTimelapse. The curves show you much more quickly what LRTimelapse is doing – with a little practice, you’ll no longer miss the ‘real time’ preview.
7. Save
Now save the sequence by clicking on the last button of the workflow in LRTimelapse.
8. Load the complete sequence in Lightroom
Back to Lightroom, where we want to load the metadata complete with all transitions for the entire sequence. Remove the filter that you used previously to show the keyframes – preferably by going to LRT Full sequence in the filter selection box.
To load the changes in Lightroom, press G to switch to the grid view, Ctrl+A to select the entire sequence, and navigate to Metadata | Read metadata from files.
Now the software will proceed to calculate new previews for the automatically generated transition images between keyframes.
9. Render the sequence with the LRT Export Plugin
This time, we don’t want to use the limited Slideshow module to output the sequence, but rather leave this job to the powerful renderer in LRTimelapse, which will communicate with Lightroom via a special Lightroom plugin.
The export proceeds via Lightroom’s customary export function.
Again, make sure you’re in the grid view (G) and that LRT Full Sequence is selected from the filter list.

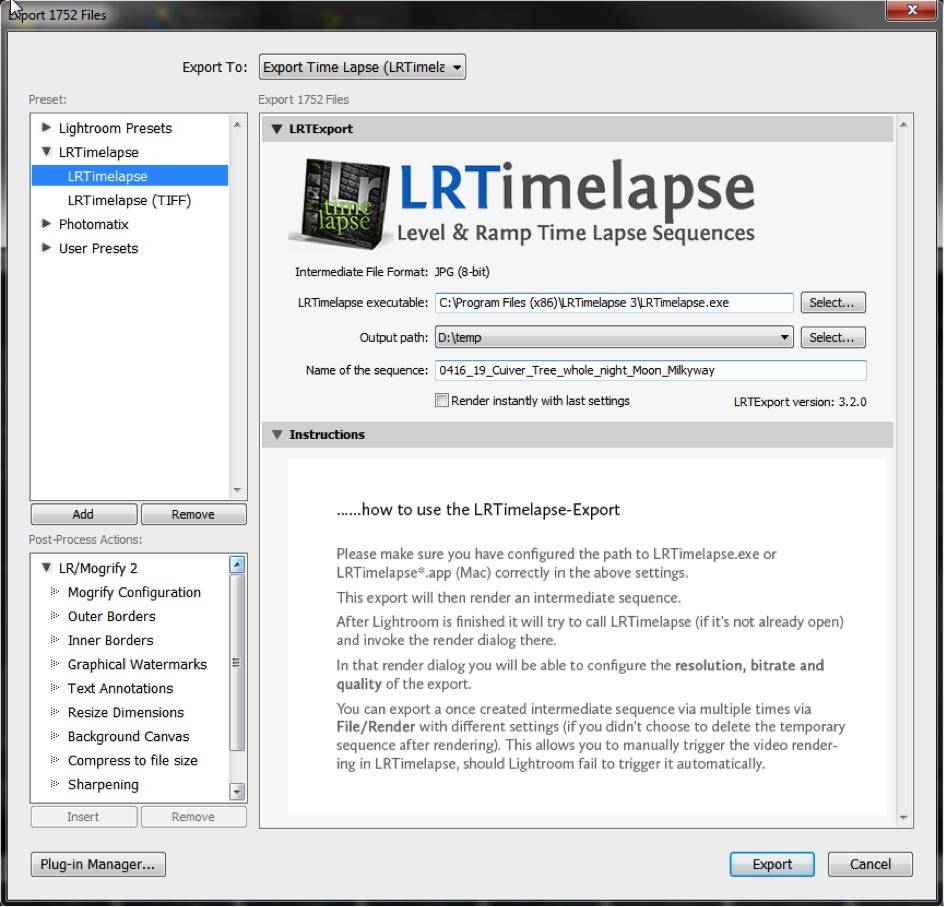
Now select the entire sequence (Ctrl+A) and click on the Export command, on the bottom left (or Ctrl+Shift+E).
If necessary, open up LRTimelapse presets from the Presets taband click on the uppermost one called LRTimelapse.
On the right, you’ll see some configuration settings that can, for the most part, be ignored from here on out. For the first usage, however, you’ll have to establish a main file path for the output.
This file path determines a higher-level path that will be used in the future to house all time-lapse films and intermediary sequences. I recommend providing a sophisticated folder on a separate hard drive with enough free space.
The name of the sequence will be automatically entered and follows logically from the folder name of your time-lapse sequence. If you end up working with many sequences, you’ll really begin to appreciate this automation.
Ensure that the option for Render instantly, using last settings is not active, and then click on Export.
Lightroom will first prepare the entire sequence as JPG files and then hand them off to LRTimelapse.
After the progress bar in Lightroom has completed its run, LRTimelapse will automatically pop up and display a dialog box in which you can define all relevant settings for the video output.
10. Render intermediary sequence videos with LRTimelapse
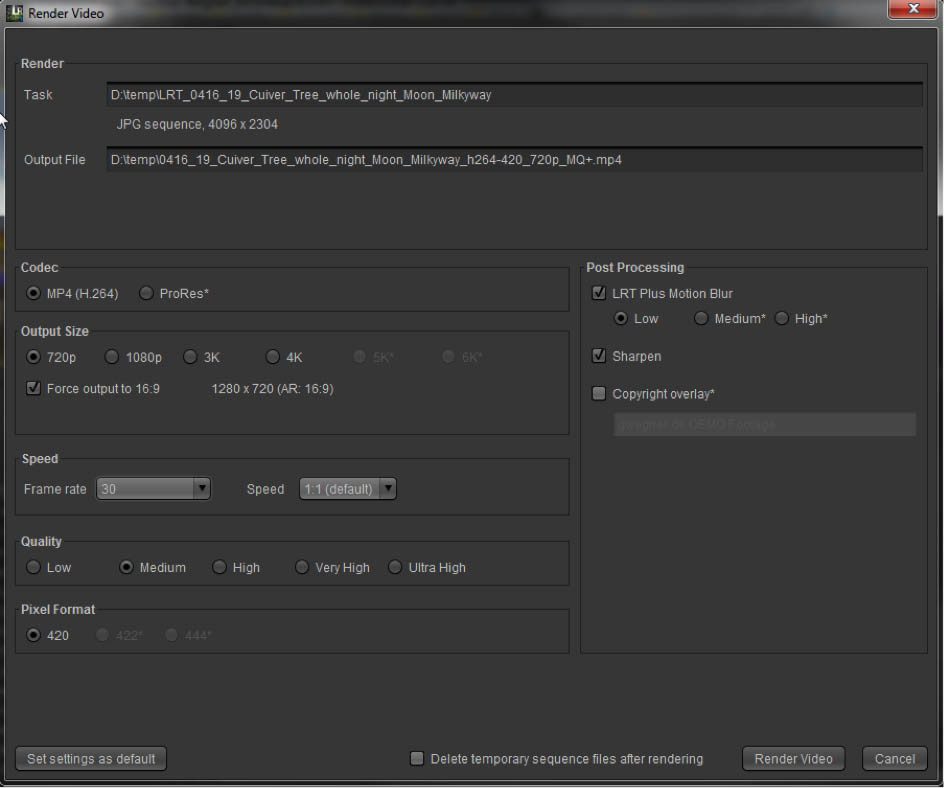
LRTimelapse will now continue on with the intermediary sequence and display a dialog in which you can set different parameters for the rendering of the video.

The sequence to be rendered will automatically be entered, and a file name for the outputted video will also be automatically generated at this point.
Automatically defined settings will be appended to the file name for the video according to an algorithm that includes the video format, the resolution, the quality, etc., so that you won’t have to give it a second thought. What’s more, any time you view the video later on, you’ll know at a glance the settings that were used to produce it. Furthermore, you can output several versions of a film with different combinations of settings without having to worry about giving them different file names.
By exporting the JPGs (or TIFFS, in the case of the Pro version) in a so-called intermediary sequence with the aide of the LRT Export plugin, all the modifications you’ve made to the developing in Lightroom will be rendered into the images. This process can take a relatively long time. You’ll notice that he subsequent rendering of the actual video in LRTimelapse, by contrast, will proceed very rapidly.
This two-stage process facilitates the rendering of videos with different settings from one existing intermediary sequence without having to go through the time-consuming development procedure for the RAW files. This enables you, for example, to first output the video with 1080p in medium quality for your own viewing purposes, to then render it again with 720p and watermarks (available in the Pro version) for a potential customer, and, once the transaction is complete, create a 4K version with higher quality for archiving and further post processing. And that eliminates having to go through the lengthy process in Lightroom over and over again.
Existing intermediary sequences – which can be recognized from the prefix abbreviation LRT_ – can be rendered anew as a video from LRTimelapse via File | Render at any time.
Caution: If you would like to have an intermediary sequence, you’ll have to make sure that the option Delete temporary sequence after rendering is not checked!
Set the desired output size in the dialog box, such as 1080p, as well as the playback rate, such as 25 fps. You’ll be able to see now how you have all standard playback rates to choose from.
The next thing to do is set a resolution quality for the video export.
Note that the “high” setting already offers a very good quality output; unless you have a valid reason for it, you shouldn’t have to choose a higher quality for the film, since doing so will inevitably also make for larger file sizes and higher demands on the player. You can always go back in and render a new video as needed, should the quality strike you as insufficient.
In the righthand area, you’ll see several functions under Edit that are applied after scaling to the desired output resolution – functions such as the output sharpness (under Sharpness). I recommend enabling that for every case.
A great function that can be used to add some smoothness to many time-lapse sequences is the LRT Motion Blur Plus. It transitions neighboring images and simulates a certain amount of blurriness in moving elements. Of course, it can’t replace working with long exposure times (as with the 180° rule) – but it can make bumpy sequences a little less so, reduce noise and, especially in combination with sequences that were shot with longer exposure times, it can bring out that ‘certain something’ in a film.
Some advanced options in the render dialog can only be implemented if you have purchased an LRTimelapse Pro license. These include rendering with the professional grade ProRes Codec.
In contrast to an MP4, ProRes files offer even less compression and a higher color depth and are preferred by professionals. Contrary to popular opinion, it’s possible to generate ProRes sequences not only on the Mac, but with the Windows OS, as well, and also to process ProRes clips for example with Premiere Pro on Windows.
ProRes Export makes resolutions of 5 to 6K possible, as well as the color-coding systems 422 and 444 that will be familiar to professionals.
What’s more, LRTimelapse Pro’s Export module facilitates higher intensities with the Motion Blur Plus effect as well as the overlaying of copyright information watermarks.
After setting the rendering parameters, remember to turn off the option to Delete temporary sequence after rendering so that, after you’ve completed the current round of edits, you’ll still be able to utilize the intermediary sequence to output videos produced with different settings.
You’ll notice that the rendering process in LRTimelapse claims a fraction as much time as outputting the intermediary sequence through Lightroom did.
Once it’s done, you’ll find the video in the directory configured by LRT Export, next to the intermediary sequence, assuming you have not had it automatically deleted.
In the appendix section 4.5 Cheat Sheet: Lightroom/LRTimelapse Workflow you’ll find a summary of the standard workflow to print out.
You’ll discover that you can edit and output your time-lapse sequences almost any imaginable way using this very straightforward yet flexible workflow. The standard workflow is the single most powerful workflow, having practical uses for most scenarios you’ll run into with time-lapse series.
What will differ is the number and position of the keyframes and the edits that you’ll preform – and therein lies the potential and the fun. There’s (practically) no limit to what you can do with creative ideas for editing keyframes and will still take profit from the Lightroom tools and flexibility of the RAW-file editing.
Any questions? Join the LRTimelapse Forum!
Should you have any questions regarding the LRTimelapse workflow and deflickering process, don’t waste time and join our dedicated forum provided to you free of charge by the Time Lapse Network!
This is one chapter about the basic editing of Time Lapse Sequences from Gunther Wegner’s Ebook Time Lapse Shooting and Processing. If you are interested in Time Lapse Photography and editing, please consider buying the EBook, since it will teach you all the secrets from shooting until the more advanced techniques like deflickering your sequences and achieving the holy grail of time lapse: perfect transitions from day to night!
For the sake of clarity, links towards Gunther’s LRTimelapse website are affiliate ones. Please note that by purchasing a license or the E-Book, you support the Time Lapse Network… so thank you for doing that!

