Learn how to install and use the Canon Hack Development Kit (CHDK): it’s easy, and it lets you enable a lot of cool features that are not natively provided by Canon cameras (especially the compact).
As an example:
- Built-in intervallometer
- HDR shooting (or bracketing, necessary if you want to do HDR photography)
- Shoot in RAW
The procedure is simple, but the website of the project is – sorry to say – just done and thought by (and for) computer geeks, and can confuse those who do not have a mindset of that type.
Fortunately there are those, however, that has created a great video tutorial that explains in less than 5 minutes how to make all and how to use this firmware that I remind you is temporary, or “does not destroy the original Canon firmware”, which can be easily restored by removing the SD card from the camera.
A praise to Richard and to his video Canon CHDK Hack Tutorial: RAW, HDR, and Time Lapse that we will illustrate here and we hope you will find useful.
Step by step guide to install the CHDK
Introduction
How to modify your Canon Camera using CHDK to shoot in RAW, HDR and time-lapse !
Richard Smrt, PhD
www.richardsmrt.com
Installation
In this tutorial I will show you how to use the Canon Hack Development Kit (CHDK).
When I was looking for information and tutorials around the web, the information that I found were quite confused, and people showing steps that were not needed.
I’ll show you instead simply how to load this firmware on your camera.
You will need:
- Canon point and shoot camera (I use the SX130 in this example)
- A SD memory card
- A SD reader SD (I use the one built-in in my computer)
- The CHDK firmware suitable for your camera (chdk.wikia.com)
Just go to chdk.wikia.com, clic on the button DOWNLOAD, find your camera in this list (in my case I have a Powershot SX130 ) , and download the latest firmware version.

Extract your memory card from your camera, and insert it in a SD reader.
Open the ZIP file, drag these files to the memory card (diskboot.bin and ps.fi2), extract the memory card and put it back in your camera.
Turn on the camera by pressing the “Play” button, press Menu and go all the way down to ” Firmware update”
Press “Set”, select OK, and the camera will reboot with the CHDK firmware.
Mode “Camera” by pressing the shutter halfway .. et voila! The Canon firmware is installed
To use the new firmware, press the button with the “smiley” and press Menu.
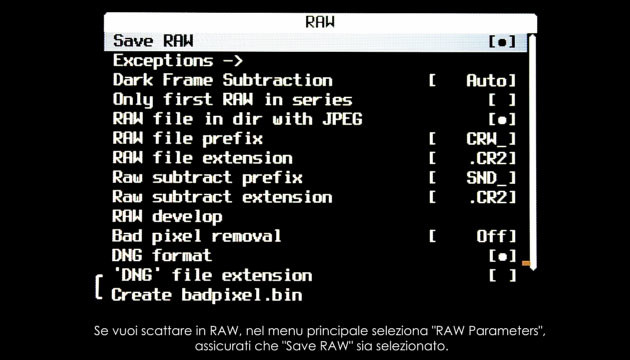
If you want to shoot in RAW, in the main menu select “RAW Parameters”, make sure “Save RAW” is selected.
This is optional, and allows you to save RAW files in the folder with JPEG. Make sure that the DNG format is selected. The system will probably ask you to create the file badpixel.bin: wait a minute or two, and the camera will do the needful.

OK, let’s see how to use for the HDR shooting.
Under “Extra photo operations”, select “Bracketing in continuous mode” using TV Bracket value, and sets a value up to 2Ev that seems to work really well.
OK, once you set the values of the bracket, click on timer and select “Custom Timer – 2sec and 3 shots” which is fine, and the machine will start to take pictures .. then I use Photomatix to process.
OK, let’s take a look at the function of automatic intervalometer, which is used for time-lapse photography.
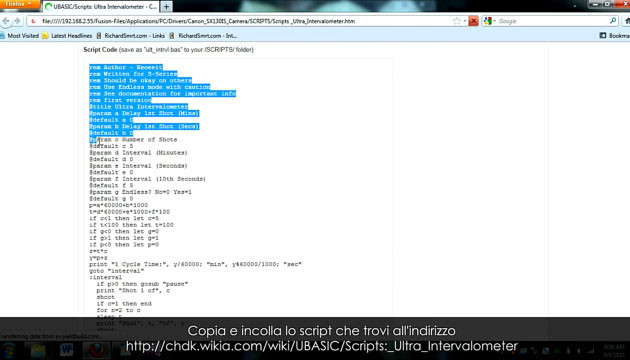
The first thing to do is create a script, which is pretty easy. Copy and paste the script that you can find at the following web address.

Open a new text document in Notepad, paste the script text in the document, and rename the file in ult_intrvl.bas
Put the SD card into your reader, and copy the file .bas in the folder /CHDK/SCRIPTS
To load the script, select “Scripting parameters” from the main menu, then “Load script from file ..”. Find the file you just downloaded and click Set.
These are the timer settings. For example, you can take every 5 seconds and select “Endless” (continuous mode), and so the camera will continue to take a picture every 5” until you turn it off .
Press the “Face” and then the shutter button completely and the timelapse start.
When you’re done you just need to re-press the shutter button to finish.
OK, that’s it. I hope you found this video helpful. Subscribe to my channel, and if you have any questions let me know. Good luck and have fun.
Support the author, share this video!
We thank Richard for his availability and for his great tutorial, that we advice you to share.
For more information, here is the information about Richard:
Richard Smrt:
Websites:
www.RichardSmrt.com – www.SynapticTracker.com
Vimeo: psynaps
YouTube: youtube.com/rsmrtBiography: I am currently doing research and teaching at University of Arizona. My primary research is focused on the genetics and neurobiology of brain development, however I have previously done a number of non-science related freelance web design and photography projects. I just recently became interested in making streaming web video tutorials. My goal is to use my experience as a web developer and teacher to explore the use of web-based streaming video as an educational tool, both inside and out of the classroom. I have gained so much knowledge from watching streaming video, it is my intention to hand this gift forward by making videos that anyone can learn from.

