Professional photographer Dario Cali will teach you how to make a time-lapse using Adobe After Effects. We would like to thank him for his kindness!
I propose this mini-tutorial to develop your shots within the software Adobe for the post-production: After Effects. Let us assume that you have already imported frames in Lightroom and have already clicked on Save on LRTimeLapse. At this point we can open Adobe After Effects.
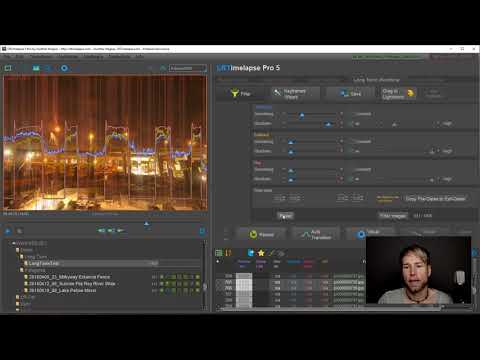
This is what we will see presented on the screen:

- Click on "Create a new composition" and use the preset HDTV 1080 25, 24-25-30 fps depending on your habits and the length of your video (I always set 1 minute for safety).
- Now press Ctrl+i or Cmd+I to import our raw sequence: to do this click on the first frame of our TL and check the box "Camera Raw sequence".
- Now you will see the screen of Camera Raw in which we process our raw (if you used LRTimeLapse directly press ok as you have already had the opportunity to process the raw earlier).
At this point we find ourselves in this situation:

Here we decide which size to assign at the Time Lapse.
Clicking with the right button on the sequence and then click on the transform and then on:
- Fit to comp if we want that our frame fills the screen
- Fit to comp width if we want the frame fills the screen but we want to maintain the aspect-ratio of the frame
If you click on the arrow next to the colored square in the sequence in the timeline of the movie a menu will open where you can change the size of the frame ad hoc by editing the values already set.
Now look over your sequence in the timeline, there is a gray bar with the edge of the orange "handles". Take the end of the bar and carry it to coincide with the end of our sequence.
Now press Control+M or Command+M to enter the export settings.

We click on the word gold near the Output Module, and then we set the values which we own pace.
I usually set: Format: Quicktime.
In Format Option I set "Apple Pro res 422 (HQ)", if this is not available you can check HDTV 1080p 24-25-30 (again depending on how you set the sequence.
The only thing that remains to do is to indicate the location of the file by clicking the "Output To", and then click Render. Here's the time lapse!
Let me know if there are any doubts or clarifications, it's my first tutorial!
Bye!
Dario
How to create a time-lapse using Adobe After Effects - Video Tutorial
As Dario's video tutorial was in Italian, we are embedding a nice video tutorial we found on YouTube which might help: