
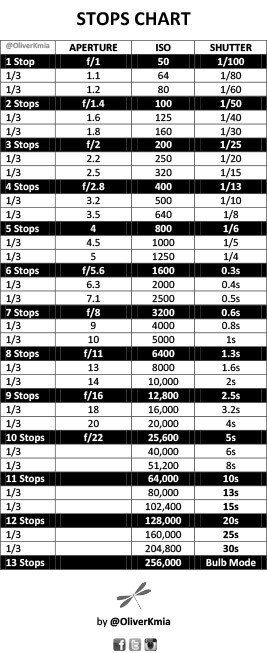
Photographer Oliver KMIA, specialized in aerial videography, time-lapse and hyper-lapse video productions, shares a little chart showing the Stops numbers of the 3 exposure settings: Aperture (lens), ISO (sensitivity) & Shutter (speed), and how it impacts on the time-lapse video making.
A little bit of background
In order to simplify the exposure calculation, there is a direct relation between the exposure settings. Assuming your subject brightness is constant, lowering or increasing one of the Exposure setting by a certain number of stop can be compensated by increasing or lowering another exposure setting.
But first, was it a stop?
A Stop is a relative way to measure the exposure. Think about a stop as a factor two. Stops make sense in relation to one another. Stops can be used for any of the 3 exposure settings.
I say factor two because lowering or increasing aperture, ISO or shutter speed by one stop is going to change the exposure by two. The subject will look two times brighter if you increase the exposure by one stop or two times darker is you lower the exposure by one stop.
For instance, changing the ISO from 100 to ISO 6400 (6 stops increase) will increase the image brightness by a factor of 64x.
| STOPS | Base | 1 | 2 | 3 | 4 | 5 | 6 |
| ISO Value | 100 | 200 | 400 | 800 | 1600 | 3200 | 6400 |
| Image Brightness | Base (normal) | 2x brighter over base | 4x
brighter over base |
8x
brighter over base |
16x
brighter over base |
32x
brighter over base |
64x
brighter over base |
Same goes the other way around if you change your ISO from 6400 to 100
| STOPS | Base | 1 | 2 | 3 | 4 | 5 | 6 |
| ISO Value | 6400 | 3200 | 1600 | 800 | 400 | 200 | 100 |
| Image Brightness | Base (normal) | 2x
darker over base |
4x
darker over base |
8x
darker over base |
16x
darker over base |
32x
darker over base |
64x
darker over base |
This example show the value for ISO but the same principle apply for Aperture and Shutter speed: one stop change equals two times brightness change
How does it work in real world?
Let’s assume that you are taking a photo of a landscape with constant luminosity (no clouds, sun not moving). Depending of the available light, you dial the camera as follow to get a correct exposure of the scene:
Initial Exposure: Aperture f/11 , ISO 1600, Shutter Speed 1/50
You take a photo with those exposure settings and the image looks right.
Now try to change the exposure as follow:
- Increase the Aperture by four stops from f/11 to f/2.8
- Lower the ISO by four stops from ISO 1600 to ISO 100
- Same shutter speed (1/50)
- Take a photo again
- It should look the same (or very close) as the previous photo in terms of brightness.
When changing an exposure setting by X number of Stop, the other setting(s) must be changed by the exact same X amount of Stops in order to maintain the same exposure.
As I said earlier, there is a direct relation between the 3 exposure settings. You could also do:
- Increase the Aperture by two stops from f/11 to f/5.6
- Lower the Shutter speed by one stop from 1/50 to 1/100
- Lower the ISO by one stop from 1600 to 800
- Take a photo again
- It should look the same (or very close) as the previous photo in terms of brightness.
As you can see, the relative Stop unit allows to play with various exposure settings by adding or subtracting Stops on each exposure setting. No need for complex computation: just add or subtract stops.
In order to summarize the previous examples, the following exposure settings are identical in terms of exposure:
Aperture f/11, ISO 1600, Shutter Speed 1/50
Aperture f/2.8, ISO 100, Shutter Speed 1/50
Aperture f/5.6, ISO 800, Shutter Speed 1/100
This is where my chart comes into play. You can easily find the Stops value for each exposure setting and jump between the different value.

Full Stops vs Third of a Stop
Most of photographers talks in term of « full » stops which are round numbers such as f/1.4, f/2, f2.8 or for the ISO, 100, 200, 400, 800, etc.
However most camera feature a third of a stop steps to change the exposure and they display the following values: f/1.4, f/1.6, f/1.8, f/2, f/2.2, f/2.5, f/2.8 or ISO 100, 125, 160, 200, 250, 320, 400, etc.
However the principle remains the same. Increasing the aperture by a third of a stop (ie. f/2 to f1.8) can be compensated by lower one the ISO (ie. ISO200 to 160) OR Shutter speed by a third of a stop (1/100 to 1/80).
Practical aspect on time-lapse
Understand the basics of stops can be helpful to create some effects when shooting timelapse. For instance while making a time-lapse sequence of traffic on the road, you may want to increase the shutter speed in order to create a nice blurry trail effect on the car at night. You would have increase the shutter speed by 4 stops going from 1sec to 8 sec. This must be compensated by lowering the ISO by the same 4 stops going from ISO 1600 to ISO 100. The image brightness will be similar but the later will produce nice long car trail at night.
Side Notes
- Even though the stops are matched, you may still notice some slight image brightness variation due to many factors such as lens vignetting or lens blades “shutter” especially at slow shutter speed.
- Also note that you should never change the Aperture setting DURING a timelapse sequence because changing the aperture requires to adjust the focus. Different aperture also generate a change in the depth of field (background or foreground blur).
- Keep in mind that most lenses perform best between one or two stops over the widest aperture and f/11 after which the diffraction will reduce the image sharpness. Ideally try to stay within a range of f/5.6 to f/11. These are just general numbers and may change for each lens. Starlapse often requires to shoot at the widest aperture and if you want to get daylight blurriness, buy a ND filter and don’t close to f/22!
Credits
@oliverkmia
Vimeo: https://vimeo.com/oliverkmia
FB: https://www.facebook.com/Oliver-KMIA-1622032868057530/
Instagram: https://www.instagram.com/oliverkmia/
Twitter: https://www.instagram.com/oliverkmia/